Ombre nails are an incredible combination of class and style, which is why they have become so popular today. This trend of nail art is quite broad, allowing for a perfect gradient of color, which could be light and subtle to dark and overpowering. For those who want to apply sparkling, flashy designs instead of the typical classy haircut, ombre nails feature French ombre to cater to their needs.
We’re excited to share twenty unique ombre nail designs that will motivate you the next time you decide to get a manicure or nail art. Whether you need something for bare nails or more intricate designs, we have ideas for all nail art lovers, whether you wish to do it yourself or visit a professional center. Are you ready to see how ombre nails can change your style and how your nails look?
What exactly are ombre nails, and how are they created?
Ombre deelname nyekang, onde onde khas yang berwarna selangi dan bercampur. Belakangan ini, ketiga teknik ini telah menjadi semakin umum dengan peningkatan penggunaan gel dan spidol. Cara paling umum untuk mencapai efek sapuan gradasi adalah dengan menggunakan set pemijlona basi na pernis dan pengganti gradasi tersebut. Artis kuku menggunakan beragam teknik untuk menyapukan warna dengan lembut bersamaan warna yang dipilih. Sicación, el resultado es un diseño asombroso que puede combinarse o adaptarse con un esmalte de uñas convencional.
Understanding the ombre nail technique
The ombre technique on nails means a blend of colors such that they nip the color next to them. Similar to how a blend of black and white would start from a slightly greyer tone before proceeding into a pure white or a deep black. The blend can be achieved in a gradient form or by blending two colors to make a pure saturation on an array of face paints. To do such, nails should start with a base coat, followed by a color as the main accent. The sponge method can be used through a makeup applicator so that the desired colors can be applied easily using airbrushes. Afterward, a top coat can be used or a sealant applied to give more durability and shine to the nail design. This method is fantastic when coupled with gel, acrylic, and even regular polish or through shine combinations, colors, nail accents, or glitter.
Tools and products needed for ombre nails
If you want to learn how to do ombre nails, you came to the right blog. Today, I will give you a complete guide to implementing understated but beautiful ombre-style nails with ease and perfection. A few pointers and techniques will be provided in detail to help you get the tools. Starting, you would need a base coat to help shelter your fingernails, followed up with a makeup sponge and polish of choice accompanied by a nail polish brush to make blending and dabbing of colors onto the natural nail a hassle-free process with ease. If the desired gradient polish doesn’t match your taste, an airbrush tool can help you further. Lastly, sprinkling glitter or gently putting stencils can ensure an even better result than expected while polishing over a coat of top to bring more resilience to the final product.
A step-by-step guide to creating ombre nails at home
- Get Your Nails Ready
Begin by scrubbing the nails so that no nail polish is left over. Use a nail file to achieve the desired shape, and then push the cuticles back. Always start with a base coat to help the nails and provide a smooth layer underneath the nail polish.
- Colors That You Desire
Choose at least two or more complementary nail polish combinations. If you wish to create an ombre look, it is advisable to choose the same family colors or ones that complement each other.
- Let Us Get Started
Now, take one of the colors you have chosen and apply it evenly over your nails. For a better finish, it is preferable to use the lighter shade first. Allow the first coat to dry adequately before proceeding to the next step.
- Rough Up The Gradient Painting
A makeup sponge can help achieve an ombre look. Apply the chosen colors on a multi-colored striped canvas to a makeup sponge, but ensure the top is a light shade and do not apply too much of the sponge.
- Final Steps That Are Required
With the help of the painted sponge that was created, dab it lightly onto the nails. Using a rolling technique, coat the nail polish and blend all the desired colors into one. This can be repeated until the sender reaches the intended shade, allowing the desired polish to dry.
- Finish the edges
Eliminating any excess polish around your nails will give your nails a tidy look. To achieve this look, grab a nail polish brush, apply some nail polish remover to it, and start brushing around the edges.
- Apply top coat
Use nail polish remover to wipe out any remaining color for a perfect DIY manicure. Remember to take proper care of your nails, as once your gradient has set in, apply a generous layer of top coat for added shine and durability. Moreover, that step smoothes out the rough edges of the color transition.
- Add finishing touches if needed.
If you wish to go the extra mile with your nails, incorporate glitter, stencil designs, and nail art for added flair. However, ensure that you wait for all the layers to dry completely. This will allow you to move your fingers without smudging your design.
In only a few hours and with just a few tools, you can create professional-looking ombre nails from the comfort of your house.
What are the most popular ombre nail designs?

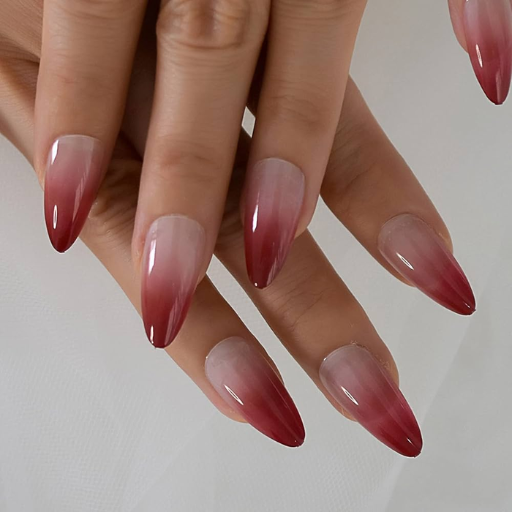
Some of the most common ombre nails are the classic gradient, which goes from dark to light in a single color for a classic touch. Another popular type is the glitter ombre, in which glittery ombres go from the base to the tips of the nails. For a showstopper, rainbow ombre nails are a perfect choice as they are full of rich color. French ombre or baby boomer nails are refined as they mix neutral and white shades for a more natural look. Another quite fashionable kind is seasonal ombre designs; for example, spring ombre can have a pastel gradient, and fall can feature warmer tones.
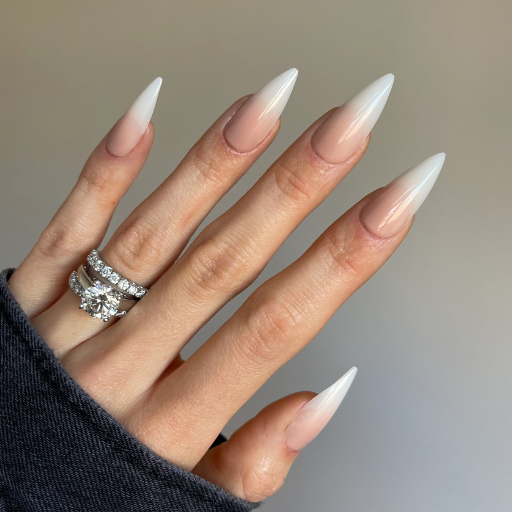
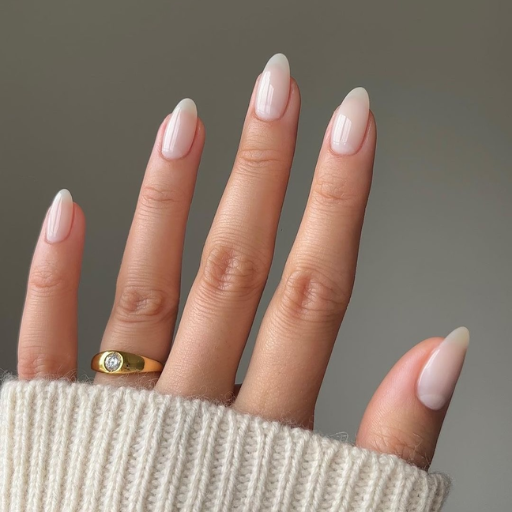
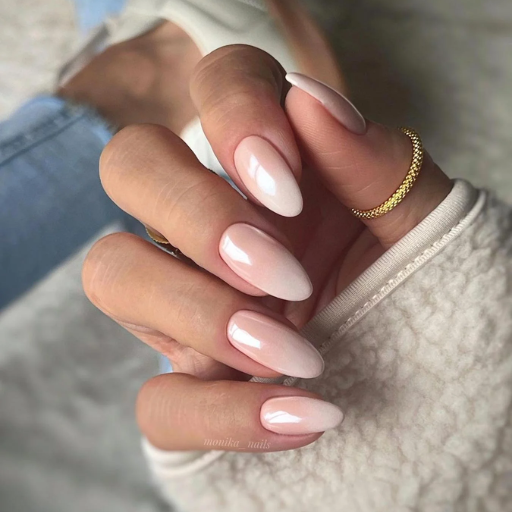
Classic French ombre nails
French ombre nails are back as baby boomer nails, the ultimate elegant style, and my favorite. This style combines a light nude or pink color with a white tip, which looks simple yet beautiful and stylish in an ombre fashion. To achieve this look, a sponge or brush blends the colors until smooth and seamless. The final result is chic and can be worn on any occasion, from a wedding to a formal event to day-to-day activities. This style attempts to renew the traditional French manicure by bringing a hint of contemporary style while keeping the older elements intact.
Glitter ombre nails for added sparkle
Ombre glitter nails are the best option for women wanting to add a sleek touch to their manicures. This design style incorporates glitter particles in a natural color, creating an out-of-the-world gradient that can be worn on casual and festive occasions. Various techniques can be used to achieve this look; options include sponging glitter polish onto the tips of the nails or brushing glitter gel onto the required space. To give the nails a professional appearance, the amount of glitter used while brushing close to the base of the nail should be reduced slowly. Colors usually pair well together, including gold glitter blending into a nude color, silver sprinkled over a light pink background, or emerald green over black with glitter.
To obtain perfect glitter ombre nails, it is advisable to start with a clean foundation to improve the result and use a base coat to protect the nails naturally. Always use high-quality glitter polish or loose glitter to maximize the sparkle and finish with a top coat for increased durability and chip resistance. For those intending to use gel polish, ensure that every coat is cured under a UV/LED lamp to achieve a long-lasting effect. Combining all these elements gives the nails a gradient effect that is quite smooth, usually due to careful blending, along with a steady hand for proper glitter placement.
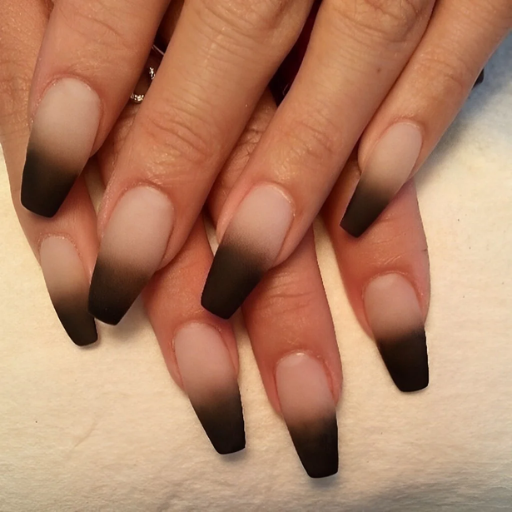
Matte ombre nails for a sophisticated look
I combine the shades for matte ombre nails to achieve a smooth and sophisticated gradient. I start by preparing my nails and base and coating them with a shimmery polish to provide protection, then applying two matte shades. I use a makeup sponge or a small nail brush to roughly layer the colors, gently blending one color into another. When layering it, lighter pressure is recommended to avoid clearly defined edges. After the ombre image appears smooth, a matte top coat is applied to maintain the soft look. This gives an elegant and simple style that can be worn at any event.
How do I choose the right colors for ombre nails?
The practice surface must be tested with combinations before being applied to nails. The ombre nails are painted from the tips to create a color gradient effect. The color combinations can be decided based on the event that is to occur. The colors blend into one another, for instance, light pink gradients into a dark rose. Using variations of the same color is really effective, too; the intention is to grab attention.
Color combinations that work best for ombre designs
In ombre design selection color combinations, I love taking soft transitions, for example, a baby blue blending out to white; what a gentle turn that is. Or, as for something more hefty, I might consider black mixing with a heavy red, which will catch some eyeballs! Seasonal shades can be a great choice as well. For instance, peach transitioning into a coral color is a good option for summer, while burgundy turning into gold will undoubtedly feel warm and festive in autumn or winter. If all else fails, beige blending into taupe is a good way for a subtle and classic look. Ensuring your colors correspond to the feeling or event gives the design a professional and appealing touch!
Seasonal ombre nail color trends
Nail art has so many variations throughout the seasons, and one of them includes the ombre nail art trend, which is omnipresent. Pastel colors such as mint green with a purple fade or a pink-lavender blend are ideal for spring. As the weather gets hotter, the colors should be as vibrant as ever, such as tangerine with fading lemon or a blue aqua, which shifts into seafoam green during summer. When Fall hits, the darker shades spread their warmth through rustic orange paints with gentle touches of chocolate brown or a muted olive green that scrapes off with mustard yellow to reflect autumn leaves; when winter hits, it is time for the deep colors to embrace us, such as navy that smoothens into silver or dark plum that glooms into glitter gold, which summons everything festive.
Some Recommendations for Perfect Ombre Designs:
- Tool selection: An airbrush would work just fine for a more polished blend of colors, or for an applied technique, try a makeup sponge.
- Gradient application: Layer thin coats one course instead of thick to promote smooth blends.
- Topcoat: A glossy clear topcoat should do the trick of highlighting depth while ensuring durability.
- Base coat: Choose a base coat that best nourishes your seasonal palette and boosts brightness and adherence.
Your ombre nail designs will remain relevant with the proper adjustments to your color techniques and color schemes for every season.
Matching Ombre Nails to Your Skin Tone
Ombre Nails look elegant, posing and flaunting, matching the ombre colors over your skin; however, picking the right tone is crucial. For example, Those with a lighter skin tone should consider lavender or baby pink as the base of the pate or icy blue, which is more chic but fair-toned. Those with a medium skin tone look better in coral, Honey yellow, or Rose gold. On the other hand, those with Deeper skin tones can pull off blue or fuschia while browney colors compliment them as well. It doesn’t matter what shade you go for as long as you nail the subtle contrast and gradients that complement your hands.
Can I get ombre nails with different nail types?
For sure!! Ombre nails can be done on any nonpolished nails, such as natural, acrylic, or gel, or they can even be done on dip powder. Gel polish works best for natural nails, providing better smoothness than salon polish. Acrylic nails should be buffed and shaped to refine the gradient, allowing advanced detailing in elegant designs. Gel nails are self-leveling, so they can be glossy and have a perfect ombre look. Dip powder nails are even more durable and have vivid gradients lasting several weeks. No matter the non-polished nail, any skilled technician could compromise your ombre pattern.
Ombre designs on acrylic nails.
Acrylic nails are much admired for their impressive artistry and splendid ombre designs, as I have experienced. Since the transformation from one color to the other is meant to be seamless, acrylic nails are meticulously hand-painted using a soft gradient to get the perfect transition in colors. Whether you want to go all vibrant or stay on the subtle side of things, it does not matter; the designs can be altered, as this type of nail offers flexibility. Not only do they look good as long they are fashionable and long-lasting, but they are also best suited for anyone needing ombre designs since they are apkink robust.
Gel polish ombre nails: Pros and cons
In my opinion, gel polish dip nails offer plenty of merits. Its main advantage is its shine and smoothness, making the ombre design seem professional. Another benefit of this is its durability, as gel polish is resistant to dries and chips, meaning, with the right amount of care, your nails can look elegant and beautiful for up to two to three weeks. Nevertheless, there are a couple of negative aspects too. The prime negative aspect is its removal, which is tedious and time-consuming and requires prolonged soaking of the nails in acetone; if done incorrectly, it could lead to the nails drying out. In addition, the application has to go through UV Light or LED curing – some people may not feel too comfortable with it. In any case, gel polish is the way to go if you want an ombre design that looks nice and has some durability.
Creating ombre looks on natural nails.
I prepare the nails, ensuring they are clean, shaped, and devoid of excess oils for undesired ombre looks on natural nails. Next, a base coat is applied to protect the nails and increase the color bond. Following the curing of the base coat, two gel polish colors are dabbed using a makeup sponge with a color blending where the two meet; I usually start with an eye shadow sponge. After achieving the desired ombre effect, every layer is cured in a UV or LED lamp. Apply the best topcoat to the design to add shine with a curing step. The color is sealed, and the design is ready. The key to a perfect and long-lasting outcome is thin, even layers with enough patience.
How long do ombre nails last, and how can I maintain them?
Ombre’s average life span is 2 to 3 weeks, depending on the product and the method used. To increase the nail’s lifespan, avoid exposure to harsh chemicals and excessive water, which could chip or damage the nails. Applying cuticle oil daily will ensure moisture and hydration for the nails and provide maximum protection during tough activities such as household chores; gloves should be worn. If you notice any lifts or chips, address them immediately to prevent further damage. Ultimately, following a proper routine will ensure longer-lasting ombre nails that look fresh and elegant.
Longevity of Different Ombre Nail Techniques
From my knowledge and assorted studies, ombre nail persistence appears to rely significantly on the technique employed. Gel ombre nails last longer than other forms, lasting 2-3 weeks, because the gel polish is designed to be durable. Acrylic ombre nails are more durable than gel ombre nails, with a life span of almost 3-4 weeks. On the other hand, dip powder ombre or traditional nail lacquer designs only withstand the test of time for around 1-2 weeks. This is because both of them are prone to wearing out. It does not matter which technique you use; as long as you use proper products alongside ensuring consistent maintenance, the results will be satisfactory.
Tips for maintaining your ombre manicure
Here are some practical tips for you to follow to help your ombre manicure look as fresh and vibrant as it possibly can for the longest time:
- Hydrate Regularly
Applying cuticle oil daily helps keep your nails and surrounding skin nourished and free of drying. Dryness can lead to cracking or peeling of the nails.
- Use Top Coat
Remember to coat your nails with a fresh coat 3 to 4 times weekly to protect the surface from daily wear.
- Protect Your Nails
Protecting your nails and gloves while washing the dishes or cleaning is a must when you want to reduce contact with items that may dull the shine of your nails.
- Avoid Harsh Treatments
Clipping your nails or applying nail polish doesn’t mean you have a tool you can use on anything you want. Treat your nails with just as much care so they do not chip or lift.
- Touch-Up as Needed
If you notice a little chipping, simply buff it to the edges and apply a coat of nail polish that matches your nails and a top coat. The damage would be seamlessly repaired.
- Prevent Excess Moisture
Avoid contact with hot water during swimming or while showering. Doing so would weaken the endurance of your ombre design due to the softening of your nail layers.
Follow these tips and promptly fix any worn nails to ensure they continue looking fresh and salon-like for a long while.
When and how to touch up your ombre nails
To keep your ombre nails looking elegant and fashionable, giving them a perfect touch-up on a routine basis is recommended. In the ideal situation, the limited touch-up should be done as soon as it is noticed that chips have begun to form, as this saves additional damage. The first step is to rub off the non-water-based acrylic paint from the nail that needs repair. After that, apply a mixture of super glue and Vaseline for a blended look. Finally, if you wish to add more of an ombre effect to your nails, simply use a darker base and paint your nails with it once the glue dries. Nail polish applications, along with nail care, add up to never needing the complete ombre nail design to be done again from scratch, as this combination is effective enough to give the illusion the nails could still look flawless even without being touched. You only have to do this every week or a half.
What are some unique ombre nail art ideas?
- Glitter Gradient Ombre: A special occasion begins with a base color of your choice. Now blend glitter polish into it, which polishes it, and voila! With the tilt of fingers, you have the sparkle and gleam to catch the eye. It appears as a glitter gradient on sparkling trình diễn nails that you are using.
- Reverse Ombre: In this presentation, instead of applying the Gradient style, you begin with a dark base and fill at the top in a lighter shade. The reasoning is simple: Apply reverse ombre for all fingers except for your thumb, for which we will apply the strike method.
- Matte Ombre: As elegant as it sounds, don’t forget to match your matte-finish nails with an ombre style. Draping etiquette only works when there is room for nice, good shades, which fuse matte with glamour and have the potential for casual and formal occasions.
- Neon Ombre: Summer shades are here, and they always have a funky look to them. Don’t be afraid to mix crazy neon colors. In your case, pink, green, and orange will make the vivid neon statement you want.
- Pastel Ombre: Along with the fusion of lavender and baby blue, adding mint green will complete the fresh look desired for spring. The three shades will together achieve your goal of giving off a soothing, naive, girly vibe and an ombre that fits along just perfectly.
These ideas at least allow you to wonder where to customize and how to go about when you are looking to get your ombre nails done and let you get them done according to your style.
Incorporating nail art into your ombre design
Nail art is probably the endless boundary when Applying ombre to your nails. A great way to decorate your ombre nails is to use a thin brush or stickers to add floral or geometric designs to your fingernails. If you are more adventurous, add metallic foil or rhinestones to your gradient for a more exquisite look. Add a silver or gold detail along your ombre lines for a classy look. If less is more is your motto, you can still use tiny minimalist dots or abstract swirls, which won’t overpower the ombre but will add something interesting to the nail. Combining nail art and ombre shading will transform your nails into a beautiful masterpiece!
Gradient nails with multiple colors
Nail art has become an increasingly popular expression of both body art and makeup; nails can be extended to great lengths while still providing room to apply eye-catching designs. One such design in great demand is Gradient nails; these ideas involve incorporating many colors to include contrast or harmony in the final design. Expert artists tend to recommend using contrast colors as they improve aesthetics and become focal points, so colors like pastels, neon, yellows, greens, and pinks can help you achieve the desired look. One can blend multiple colors to create a sunset, ocean, or candy nails that give off a bold but playful appearance.
To achieve a believable gradient, one can roll or press a sponge on their nails after applying a base coat to their selected color or wear while overlapping the edges; this method ensures further blending of the colors. Emphasis on waiting for each layer to dry before incorporating another is important as this guarantees the colors do not blend even further; one can repeat the layering process until their desired vibrancy is achieved. Once dry, applying a Matte or Glossy coat can help seal the design to ensure a long-lasting experience.
Gel nail polish is the best option for achieving long-lasting effects. Traditional lacquer works just as well if you want easy touch-ups and removal. Pay attention to technical details, such as ensuring the sponge texture is smooth enough and gluing liquid latex or tape around the nail bed for easy cleaning. Multi-color gradients can elevate the intricacy and elegance of any manicure, and they are a trend worth trying out. This style is highly versatile, with smooth gradients or mixed bold colors.
Combining ombre with other nail trends
Ombre nails have recently become more interesting by being mixed or fused with multiple other nail designs. Ombre nails can stand out when mixed with intricate florals, geometric pieces, or metallic foils. Glitter can be mixed with an ombre base, making the design appropriate for special occasions. Consider negative space or minimalistic features on a gradient design as they modernize the overall look while remaining classy. The possibilities are limitless, which adds to the beauty of making ombre nails.
References
Frequently Asked Questions (FAQ)
Q: What is ombre nail design, and how is it created?
A: Ombre nail design is a gradient effect where one color fades into another. It’s typically created using nail polish or gel nail products. The ombre effect is achieved by blending two or more colors, often using a makeup sponge to create a seamless transition. This technique can be applied to various color combinations, including popular styles like French ombre, black ombre, and nude ombre nails.
Q: How do I create a French ombre nail design at home?
A: To create a French ombre nail design at home, start with a base coat, then apply a nude or pale pink polish. Using a makeup sponge, dab white polish onto the tip of the nail, blending it downwards. Repeat this process, gradually building the white color for a smooth transition. Finish with a top coat for a glossy, long-lasting ombre French manicure look.
Q: What are some popular color combinations for ombre nails?
A: Popular ombre nail color combinations include: 1. White to nude for a classic French ombre 2. Black ombre nails for a dramatic look 3. Pink ombre nails for a feminine touch 4. Blue ombre nails for a cool, calming effect 5. Yellow ombre for a sunny, cheerful style 6. Red ombre for a bold, passionate look
Q: Can I get ombre nails with gel polish at a nail salon?
A: Yes, many nail salons offer gel nail ombre designs. Gel polish is an excellent choice for ombre nails, providing a smooth, long-lasting finish. Professional nail artists can create stunning ombre effects using gel polishes, including popular styles like French and various color combinations. Gel ombre nails typically last longer than regular polish ombre designs.
Q: How can I maintain my ombre nails and make them last longer?
A: To maintain your ombre nails and extend their lifespan: 1. Apply a quality top coat every few days 2. Wear gloves when doing household chores 3. Keep your hands and nails moisturized 4. Avoid using your nails as tools 5. Be gentle with the skin around your nails and cuticles 6. If using regular polish, touch up the ombre effect as needed
Q: Are ombre nails suitable for short nails?
A: Yes, ombre nails are perfect for short nails! The gradient effect can create an illusion of length, making your nails appear longer. Use lighter colors or a French ombre style for short nails to maximize the lengthening effect. You can also try vertical ombre designs to enhance the appearance of longer nails further.
Q: Can I create ombre nails using press-on nails?
A: Absolutely! Press-on nails offer a convenient way to achieve stunning ombre nail looks without the need for advanced nail art skills. Many brands provide pre-designed ombre press-on nails in various styles, including French and colorful gradients. Before applying, purchase plain press-on nails and create your ombre design using nail polish and a makeup sponge.
Q: What tools do I need to create ombre nails at home?
A: To create ombre nails at home, you’ll need: 1. Base coat and top coat 2. Nail polishes in your chosen colors 3. Makeup sponges 4. Nail polish remover 5. Nail tape or liquid latex for easy cleanup 6. A small brush for touch-ups 7. Cuticle oil for finishing touches: These tools will help you achieve a professional-looking ombre nail design and elevate your nail game.


