
Fuses are critical components in your car’s electrical system, designed to protect circuits from overloading or short-circuiting. When a fuse blows, it can result in malfunctions such as non-working headlights, dead interior lights, or issues with the power windows, leaving drivers puzzled and potentially concerned. Fortunately, removing and replacing a fuse is a straightforward process that requires minimal tools and can often be done without professional assistance. This guide is designed to provide a clear, detailed walkthrough for diagnosing and safely removing a blown fuse in your car, regardless of your mechanical expertise. By following these steps, you can save time, restore optimal functionality to your vehicle, and gain a better understanding of how your car’s electrical system operates.
Where is the fuse box located in my car?
Common locations for car fuse boxes
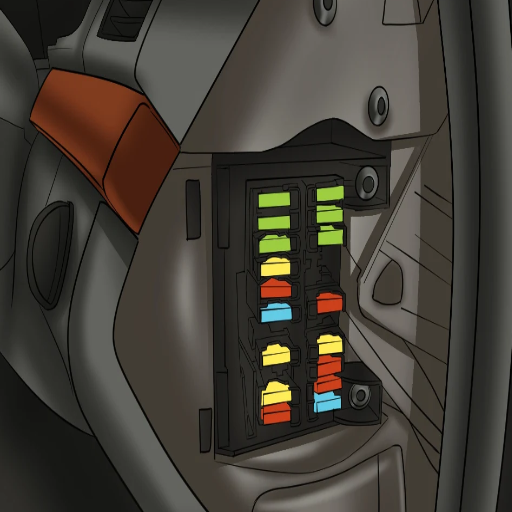
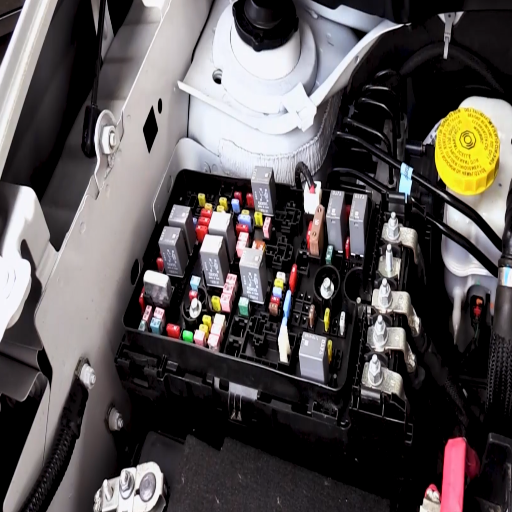
In my view, fuse boxes in automobiles are installed in two general locations to allow for easy access while keeping them shielded from the harsh effects of the external environment. For instance, the first point of placing the fuse box is on the front compartment of the car close to the engine, usually found near the battery and alternator. This is important for areas that require such systems as fuel pumps, radiator fans, or even headlamps next to the hood. The second point is usually below the dashboard inside the cabin and tends to be more common on the driver’s side and on rarer occasions the passenger or the glove compartment side. These are referred to as interior fuse boxes and are generally fitted with systems that require electric input like power windows, profane lights, and even stereo systems.
- Voltage Specification Criteria: The majority of the 12-volt systems and the heavy-duty vehicles usually have a 24-volt system, these are commercial.
- Current Specification: Each fusibility contains an amperage which could vary from 5A, 10A, or 15A.
- Environmental Protection: In order to prevent water damage to the car fuses, certain vehicles are fitted with extra dampness. For example, construction vehicles have protective casings for fuses fitted.
A proper fit that requires accurate details for power supply in terms of location and body compatibility of the car fuse box is essential to the repairs.
Using your owner’s manual to find the fuse box
To find the location of the fuse box in your vehicle, check the manual which is issued by the manufacturer. Usually, it has a diagram that makes it easy to understand where the fuse box is located and its configuration. Under the dashboard, at the engine bay area, below the hood, or on certain vehicle models in the trunk are normal areas for this too.
- 5A Fuse: Used for low-current devices such as electronic displays or interior cabin lighting.
- 10A Fuse: Usually associated with medium current devices, it is often linked to power mirrors and more recently infotainment systems.
- 15A Fuse: Used on higher current devices including windshield wiper motors and seat heaters.
When accessing the manual, check the replacement fuse possesses the appropriate amperage and type needed for use on your vehicle. Wrong use of the suggested fuse rating is a hazard both in terms of safety and operation of the component, and this is accepted in terms of automotive safety systems.
What tools do I need to remove a car fuse?
Using a fuse puller: The safest method
The use of a fuse puller is a far more optimal and safe option when it comes to removing car fuses to allow repair or maintenance on the vehicle. The use of a fuse-type specific grip further prevents any accidents that could cause unnecessary damage.
- Identify the fuse box: The first step is to always consult the service manual which provides adequate information regarding the location of the fuse box.
- Identify the required fuse: Determining the type and rating of the fuse being used is critical to ensure that the correct amperage rating is met. In most cases, a 5A, 10A, or 15A should suffice.
- Remove the fuse by the use of the fuse puller: Always remember to firmly grab the fuse using the puller and ensure that steady pressure is applied to avoid any chances of the fuse breaking.
- Inspect the fuse: The final step is to visually examine the fuse for a broken wire or any signs of discoloration which could potentially show that the fuse is damaged and broken.
Ensure that the amperage rating is exact, for example, a 10A for a low-power accessory is an appropriate measure to take as it maintains integrity while working on the vehicle. The use of a fuse puller adds to the precision which avoids chances of damaging sensitive car equipment and systems.
Alternative tools: Pliers and tweezers
In case of an emergency such as when a fuse puller is unavailable, the use of pliers or tweezers for fuse removal is an alternative. While utilizing such tools it is advisable to use insulated grips, else there may be a risk of electric shocks or short circuits. When utilizing these tools bear in mind to grip the fuse and gently pull it straight, this will minimize the chances of any damage to the fuse or its housing.
- Grip Insulation: Always, ensure the pliers or tweezers have insulation that is rated more than 1000V this would minimize chances of accidental electrical contact.
- Size and Precision: Use Individually sized precision pliers or tweezers that are more compact, this would ensure proper fit within the fuse boxes preventing any damage to the other components.
- Force Application:A pply consistent and controlled pressure to avoid breaking the fuse or deforming its connection points.
Such tools pose a viable alternative however one must exercise caution as the misapplication of such tools or techniques may compromise the integrity or safety of the system.
Can I remove a fuse without special tools?
Even though caution should be observed during handling, it is still possible to take a fuse out without any special tools; in fact, doing so using one’s hands is highly encouraged as this enhances the durability of the connection points. If the fuses are tightly fitted, a non-metallic flathead screwdriver can also be used to slightly pry the fuse off. It is crucial to switch off the system before manipulating it to prevent electrical hazards.
- Fuse Rating: Prior to taking off a fuse, ensure to check its voltage and current ratings which can also be useful for determining the replacement.
- Socket Compatibility: Inspect whether the socket of the fuse has been damaged or is intact because this can affect the fitting of the new fuse.
- Safety Precautions: Either turn off the power source or utilize a reliable circuit tester to be sure that there is no electricity utilized in the circuit.
Adhering to these guidelines minimizes risks and ensures the electrical system remains functional and safe to operate.
How do I safely remove a fuse from my car?
Step-by-step guide to removing a car fuse
- Find The Location Of The Fuse Panel: First, you would need to check the manual of the vehicle to find where the fuse panel is located. It’s typically located beneath the dashboard, on the left-hand side of the vehicle near the driver’s left foot, or in the engine bay.
- Switch Off The Ignition: Confirm that the locomotion’s ignition is currently switched off and that the car’s ignition keys are now removed from the vehicle to avoid any electrical damage.
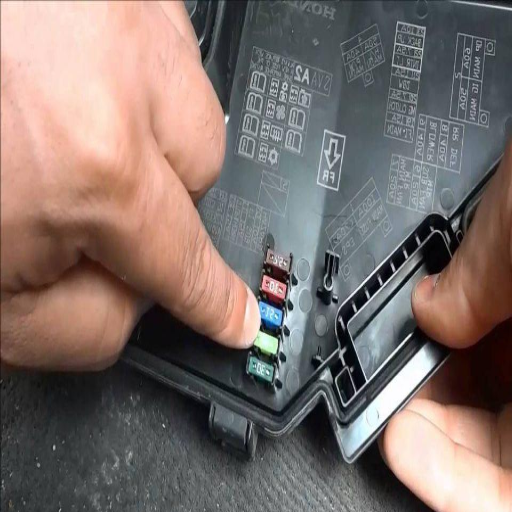
- View The Fuse Diagram: Use the fuse diagram, which is generally found on the cover of the fuse panel or in the user’s handbook, to ascertain the particular fuse that corresponds to the electrical device that is out of service. Gas fuses usually have a rating inscribed in Amperes, for example, 10A, 15A, etc.
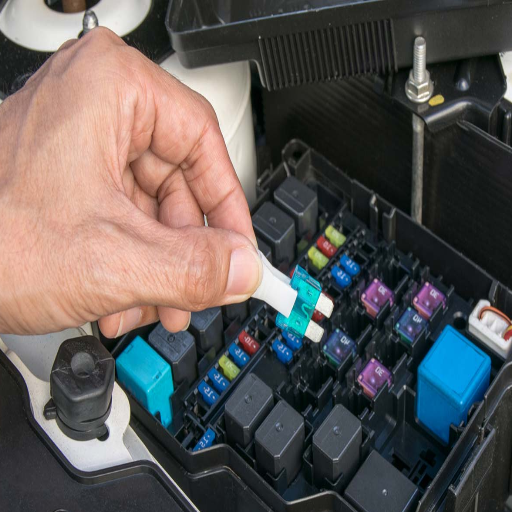
- Use The Right Tool: The use of special spoons which are normally kept inside the fuse panel, or needle nose pliers can be used for the safe and easy removal of the fuse.
- Take Off The Fuse: Hold the fuse with the tool and wiggle it slightly to disengage it from the socket, however, one should not force it. Now, look inside the fuse for the metal filament. The fuse is blown if the filament is broken.
- Replace if Necessary: Only fuses with a rating that is identical to the one that is blown should be used. For specifications, refer to either the car manual or the cover of the fuse panel. If the Amperage is incorrect it may cause a fire or an electrical malfunction of some sort.
- Reinstall and Test: Secure the new or existing fuse back in the socket. Once the ignition is turned the corresponding system should be checked to ensure it works correctly.
When applied, these common practices and caution prevent any safety hazards in the electrical hardware of the vehicle.
Tips for handling small fuses and avoiding damage
- Utilize Precision Tools: It is advisable to pull the fuse using a fuse puller or even using a needle-nose plier that is specifically tailored for small electrical components. This prevents any bending or housing of the fuse from any damage.
- Confirm Compatibility: Check if the replaced fuse is appropriate for the voltage and the current rating of the system in the vehicle. For instance, if a 10A fuse is required in the system, it is recommended not to use any setting with a higher/lower than rated amperage fuse as this can deteriorate the functioning or may even compromise safety.
- Perform Close Inspections of Fuses: Examine the fuse body to identify any physical visible impairments like cracks or burn marks before inserting the fuse again. In case there is suspected damage to the fuse’s body, replace the fuse with an undamaged one.
- Refrain From Over-Tightening: Avoid excessive force when putting on covering or tightening components as it will compress the casings around the fuse holder and might displace it.
- Employ Clean Conditions: Clean and dry the area around the fuse box since corrosive dirt or moisture can make it electrically weak or even inoperative. Ensure all work with the fuses is done within a clean environment so that contamination isn’t present.
- Look at the Manual: Cross-check the appropriate repair guide with the standard operating procedures and its placement.
By adhering to these tips, you minimize the risk of system malfunction and ensure the longevity of your vehicle’s electrical components. Always prioritize precision and follow guidelines to maintain optimal safety during repairs.
How can I tell if a car fuse is blown?
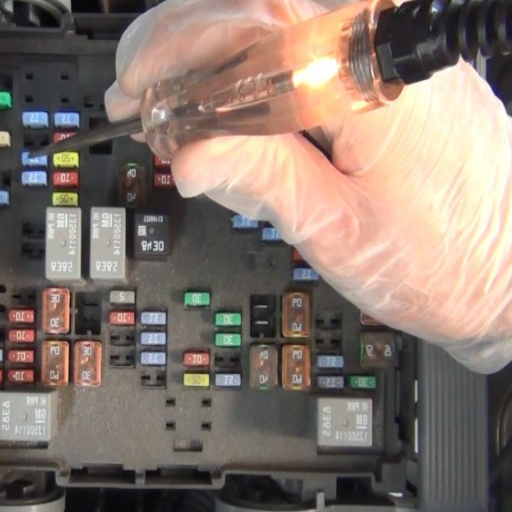
Using a test light to check fuse functionality
In this guide, I have set out specific steps to allow you to test a fuse with a test light from start to finish. These steps attest to the accuracy and the reliability of what you are trying to accomplish.
- Vehicle Power Off: There is a need to switch off the Ignition and all the electronic elements before attempting to use a test light to ensure safety.
- Test light selection: It is necessary to choose an auto circuit tester that has a voltage range that corresponds to the car’s system.
- Fixing and locating fuse relays: The car’s fuse box is on the owner’s manual and it can be searched –ensure that the preparation area is clean and dry to reduce contamination.
- Both parts of a fuse may be replaced and wired to each other by a test: Connecting one end of the test light to the ground, the two ends of the fuse are tested. As the test lights for both terminals illuminate the fuse is working. In the event that the light only shines on one terminal or not at all then that fuse has blown.
- Confirming the grounding is incorrect: Before the orientation,n I double-check the test light to ensure it’s grounded accurately before going near a power source.
For Auto Electrical Troubleshooting this method is quick as it eliminates the need for fuse removal before repairs.
Common signs of a blown fuse in your vehicle
While troubleshooting a blown fuse in a vehicle, I see the following issues:
- Broken electrical parts: Some devices such as headlamps, power windows, or the radio, will no longer work. For example, a radio circuit that has a 15-amp fuse will stop working altogether if the fuse blows.
- Dead operation of accessory components: Such as seat warmers, internal lighting, or cigarette lighters may not illuminate.
- Looking at the fuse: As I remove the fuse that I think might be blown, I check for a broken filament or discoloration (burn marks) on the body of the fuse – these are clear indications of fuse failure.
- Repeated fuse failures: If the same fuse continues to blow after replacing it, this suggests that there is a problem with that particular circuit; for instance, a short circuit that exceeds the range rated for the fuse.
By understanding the fuse rating and the corresponding circuit specifications, I can systematically determine and address the issue without unnecessary troubleshooting steps. Always ensuring accuracy in diagnosis, I avoid replacing fuses with incorrect ratings to protect the integrity of the electrical system.
What precautions should I take when changing car fuses?
The importance of matching amperage ratings
It is of utmost importance to pay attention to the ampere rating of the fuse when replacing a car fuse since a mismatch can affect the performance of the electrical system of the vehicle. If the car fuse rating is greater than the specified amp rating, excessive current will flow and the circuit might overheat wires might be damaged or even a fire might occur which is extremely dangerous. Alternatively, a fuse with a lower amp rating than required would cause flooding in the fuse and would keep cutting off the circuit without need.
A fuse is used to protect a circuit by suitably rated components including suitably rated wiring, therefore, the amperage ratings of a fuse have to be by that circuit: For example,
- Common Fuse Ratings: Car fuses are common and typically lie between 5amps to 30 amps.
- Correct Ratings: If there is a 15-amperage rating in a fuse box or in a car’s manual, such rating should never be removed unless the fuse stops working. Otherwise, the circuit would be ruined as there would be excessive current.
Replacing a fuse, I am ensuring that I use one with the correct amp rating, in doing so, the electrical systems fitted in the vehicle will remain safe and no risk will be posed.
Should I disconnect the battery before changing fuses?
It is advisable to remove the battery before replacing fuses, as this prevents short circuits or electric shocks from occurring. By removing the negative terminal of the battery, I can completely de-energize the electrical system, thereby reducing the risks while working on the fuse box.
- Disconnection Procedure: The battery is disconnected by first disconnecting the negative terminal which is indicated by the sign ( – Infra-red sign ). Certain vehicular systems might require a 10mm spanner for this process.
- Volts: The common automotive battery voltage rating is twelve volts direct current (DC); however, even at this low voltage charging safety practices are necessary because of the high current.
- Protection against potential impact: Disconnecting the battery can also save some elastic electronic components from high voltage when replacing the fuses.
Having in place this safety protocol guarantees my safety as well as the safety of the car’s electrical system.
Safety tips for working with automotive electrical systems
- Always Disconnect the Battery: I always take care of disconnecting the battery be it while changing a fuse or working on any electrical component of a vehicle. This is done by removing the negative terminal followed by the positive to ensure that in case, there is any power surge or steady discharge, then the device will withstand it.
- Use Proper Insulated Tools: Using either a screwdriver or spanner, when working on the electrical sides of the components, is strictly prohibited as they act as a safety feature for preventing shocks or unearthed tools.
- Check Voltage Levels: It’s always important to check the voltage level before starting any electrical component. In most cases, for an automobile vehicle, it’s 12V DC which should align with the system’s specifications setup. If the electrical components are fitted on the vehicle then the currents and voltage specs provided with them also need to be checked to prevent any damage or connection inconsistencies from occurring.
- Wear Personal Protective Equipment: PPE consists of insulated gloves, goggles for safety, and specific types of shoes that prevent electrical shocks and burns while on the job because job safety is always the priority.
- Inspect Components thoroughly: In seeing if a particular fuse or any electrical component is damaged, corroded, or has some loose ends, the best method is to examine the electrical part closely to see if it has any issues, especially before replacing it.
- Avoid Working in Wet Conditions: I avoid working in conditions where the air moisture is dense or water is present, to ensure that no electrical shock occurs while using electrical parts, this helps ensure a controlled and dry environment is maintained.
- Review and implement the Fuse Replacement Policy: I am very observant of the fuse rating as I only replace electrical fuses. Similarly, if a 15A electrical fuse were to burn out, I would replace it with another 15A electrical fuse because using a higher amperage can cause damage to delicate circuits This practice safeguards the circuits from any potential damage.
When I comply with those safety measures, I protect myself from dangers as well as protect the vehicle’s electrical system.
Reference sources
Frequently Asked Questions (FAQs)
Q: How do I locate the fuse panel in my car?
A: To locate the fuse panel, check your car’s owner’s manual. It’s typically found under the dash on the driver’s side, in the glove compartment, or under the hood. Once you find it, remove the fuse panel’s cover to access the fuses.
Q: How can I tell if a fuse is blown?
A: A blown fuse will have a broken metal strip inside the clear plastic housing. You can also use a multimeter to test fuses. If it’s blown, the fuse will show no continuity. Some vehicles have blade fuses, while others have cylindrical fuses, but the principle is the same for both types.
Q: What tools do I need to change a car fuse?
A: Most cars come with a fuse puller tool, usually located in the fuse panel. If you don’t have one, needle-nose pliers or tweezers can work. Some auto stores like AutoZone sell specialized fuse removal tools. You’ll also need a replacement fuse of the correct amperage.
Q: Can you provide a transcript or step-by-step guide on how to change a fuse?
A: Sure! Here’s a quick transcript: 1) Locate the fuse panel and identify the blown fuse. 2) Use a fuse puller or pliers to grasp the edge of the fuse. 3) Pull the fuse straight out – don’t yank or twist. 4) Check if it’s blown by looking at the metal strip inside. 5) Insert a new fuse of the same amperage. 6) Replace the fuse panel cover. 7) Test the electrical component to ensure it’s working.
Q: What are some tips and tricks for safely changing a car fuse?
A: Some helpful tips include: Always turn off your vehicle before changing fuses. Never use a fuse with a different amperage than specified. Keep spare fuses in your car for emergencies. If a fuse keeps blowing, there might be a larger electrical issue – consult a mechanic or technician. Don’t use metal objects like a screwdriver to remove fuses, as this can cause damage or shorts.
Q: What should I do if changing the fuse doesn’t fix the problem?
A: If changing the fuse doesn’t solve the issue, there might be a more serious electrical problem. Check if other related fuses are blown. If the check engine light is on, it might indicate a different issue. In such cases, it’s best to consult a professional auto repair service or take your car to a dealership for diagnosis.
Q: Are there different types of car fuses?
A: Yes, there are different types of car fuses. The most common are blade fuses, which come in various sizes and colors indicating different amperages. Some older cars use glass tube fuses. It’s important to replace a fuse with one of the same type and amperage to ensure proper function and avoid electrical issues.
Q: How often should I check the fuses in my car?
A: It’s a good idea to check your car’s fuses periodically, especially if you notice any electrical issues. Many drivers only check fuses when something stops working. However, including a fuse check in your regular maintenance routine, perhaps every six months or during oil changes, can help prevent unexpected electrical problems and keep your vehicle running smoothly.


