When it comes to setting beauty trends, Hailey Bieber is a name that consistently shines, and her viral “glazed donut nails” are no exception. This unique manicure style has taken the world by storm, blending minimalist elegance with a high-gloss, shimmering finish that mimics the irresistible sheen of a freshly glazed donut. But what exactly are glazed donut nails, and how can you recreate this iconic look at home or in the salon?
In this blog post, we’ll explore everything you need to know about glazed donut nails—from their origin and rise to popularity, to the step-by-step process of achieving the perfect pearly glow. We’ll also share tips on selecting the right products, discuss the versatility of this manicure for various occasions, and highlight why this trend has captured the hearts of beauty enthusiasts worldwide. Whether you’re a nail art novice or a seasoned pro, this guide will inspire you to give glazed donut nails a try and elevate your manicure game.
What are glazed donut nails and why are they so popular?
Glazed donut nails are trending because of their smooth and lustrous finish, which perfectly resembles the glaze on a donut, thanks to a slightly shimmery pearlescent tint. A mixture of neutral or sheer nail polish along with reflective powder or tops coating is used to attain the desired look which oats an exceptional glass effect. The style stands out because of its simple ability to compliment a variety of looks, as well as its ability to fit both a more casual day and an upscale occasion. This trend drew popularity due to celebrity endorsements through social media and became a favorite among people looking for a sleek and modern manicure.
The origin of the glazed donut nail trend
The glazed donut nail trend can be traced back to celebrity influence, particularly Hailey Bieber, who debuted the iconic look at various red carpet events in 2022. Inspired by the shiny, frosted appearance of a glazed donut, this nail aesthetic was created in collaboration with celebrity nail artist Zola Ganzorigt. Ganzorigt used a combination of neutral-toned polish and a chrome powder topcoat to achieve the signature luminous finish. Social media platforms like Instagram and TikTok quickly propelled the look to global fame, with countless influencers and beauty enthusiasts sharing tutorials and recreations. Rooted in simplicity and elegance, this trend reflects the broader appeal of minimalist beauty styles in recent years.
How Hailey Bieber popularized the look
Hailey Bieber’s “glazed donut nails” gained widespread attention after she showcased them during promotional events for her skincare brand, Rhode, in 2022. The nails perfectly complemented her brand’s dewy, glowing aesthetic, seamlessly tying together her beauty philosophy of radiant simplicity. Paired with her strong social media presence, Bieber frequently posted close-ups of her manicured hands on Instagram, sparking intrigue and admiration among fans. Beauty professionals and influencers quickly began recreating the look, crediting Bieber for her influence. The distinctive, iridescent nails became a signature for Hailey and an emblem of effortlessly chic style, inspiring millions to adopt the trend globally.
The appeal of the pearlescent finish
The pearlescent finish captivates due to its luminous, multidimensional quality that reflects light beautifully, creating an eye-catching shimmer. This effect mimics the subtle elegance of natural pearls, offering a sophisticated yet approachable style. The finish enhances any manicure by providing depth and radiance while remaining versatile enough to pair with casual or formal looks. Its universal appeal lies in its simplicity blended with a touch of glamour, making it a go-to choice for those seeking an elevated yet effortless aesthetic in nail trends.
How to achieve the perfect glazed donut nail look

Prepare Your Nails
Begin by cleaning and shaping your nails. File them to your desired shape and gently push back the cuticles for a neat base. Apply a nourishing cuticle oil to keep them hydrated.
Apply a Base Coat
Use a high-quality base coat to protect your nails and ensure a smooth application. This step also helps extend the longevity of your manicure.
Choose a Neutral Polish
Opt for a soft, neutral shade, such as pale pink, beige, or sheer white. Apply one or two thin coats, allowing each layer to dry completely before proceeding.
Add the Pearl Effect
Using a chrome powder or pearlescent topcoat, add the “glazed” effect. Lightly buff the powder onto the nails or layer the topcoat evenly for that signature shimmer.
Seal with a Top Coat
Finish the look with a glossy top coat to lock in the shine and ensure durability. A quality top coat enhances the radiance while protecting your manicure from chipping.
Maintain Your Look
Keep your nails looking polished by reapplying a top coat every few days and moisturizing your hands regularly. This will preserve the glazed effect and keep your nails healthy.
Choosing the right base color and chrome powder
Selecting the ideal base color and chrome powder is crucial for achieving the desired glazed nail look. Typically, neutral or pastel base shades, such as white, pink, or nude, are most effective as they enhance the reflective quality of chrome powders. For a bolder effect, darker base colors like black or deep blue create a dramatic, high-contrast shine.
When it comes to chrome powders, the options vary based on the finish you want. Pearl or iridescent powders are perfect for a delicate, opalescent sheen, while gold or silver chrome powders deliver a classic, mirror-like effect. Ensure the powder is finely milled for a smoother application and more consistent shimmer. Matching the base color and powder allows you to achieve a harmonious and striking final look. Always opt for high-quality products to ensure longevity and a flawless finish.
Step-by-step application process
Prepare Your Nails
Begin by cleaning and shaping your nails. Push back cuticles, file to your desired shape, and lightly buff the surface of your nails to remove any oils or shine. This creates an even base for the powder to adhere to.
Apply a Base Coat
Use a gel or regular nail polish base coat depending on the type of powder being used. If you’re working with gel, cure it under a UV or LED lamp until it’s dry but sticky to the touch.
Add a Base Color
Apply a complementary or matching base color if desired. This step helps enhance the powder’s final appearance. Cure the color layer if it’s gel-based, or allow it to dry completely for regular polish.
Apply the Powder
While the nail is still tacky (if using gel) or partially dry (if using regular polish), use an applicator sponge or a fingertip to gently rub the powder onto the surface. Start with a small amount and build up coverage as needed.
Buff and Blend
Carefully buff the powder into the nail surface using circular motions. This ensures an even, smooth finish and enhances the reflective or shimmering effect.
Seal with a Top Coat
Apply a non-wipe gel or regular top coat to lock in the powder and create a glossy finish. Cure the top coat if necessary, ensuring it is fully dry and set to prevent smudging.
Clean Up
Use a small brush or cotton swab dipped in polish remover to clean any excess powder from your cuticles or surrounding skin. This step perfects the overall look.
By following these steps, you can achieve a flawless, professional-grade finish with nail powders, enhancing any manicure style you desire.
Tips for a long-lasting glazed manicure
Prep Your Nails Thoroughly
Proper nail preparation is essential for a durable manicure. Make sure to clean your nails, push back cuticles, and lightly buff the nail surface to remove oils and create a rough base for better adhesion.
Apply Thin, Even Layers
When applying base coats, powder, or top coats, ensure each layer is thin and even. Thick applications can lead to bubbling or peeling, reducing the manicure’s longevity.
Seal the Edges
Seal the free edges of your nails with both base and top coats. This step prevents chipping by creating a smooth, protective barrier at the tips of your nails.
Avoid Water Exposure Early On
Keep your nails dry for several hours after application. Prolonged water exposure can weaken the bond between the powder and your nails, making them more prone to peeling or chipping.
Use Cuticle Oil Daily
Hydrate your nails and surrounding skin with cuticle oil to prevent dryness and cracking. Healthy nails are less likely to experience damage, ensuring longer-lasting results.
Protect Your Nails During Activities
Wear gloves when doing chores, such as cleaning or washing dishes, as chemicals and water can erode the manicure over time. Protecting your nails during high-impact activities maintains the glaze’s brilliance.
By incorporating these tips into your nail care routine, you can maximize the longevity and luster of your glazed manicure.
What tools and products do you need for glazed nails?

To achieve stunning glazed nails, you’ll need the following tools and products:
Nail File and Buffer – For shaping and smoothing your nails.
Base Coat – To protect your nails and provide a smooth surface for application.
Gel or Regular Nail Polish – Choose a color that complements the glazed effect.
Top Coat – A high-shine or gel-like finishing top coat helps create the glazed appearance.
UV/LED Nail Lamp – Essential for curing gel-based products.
Cuticle Oil – To hydrate and nourish your nails and cuticles.
Lint-Free Wipes and Nail Cleanser – For cleaning and prepping nails without residue.
With these tools and products, you can easily recreate the iconic glazed nail look at home or in a salon.
Essential nail polishes and gels
To achieve the perfect glazed nail look, selecting the right nail polishes and gels is crucial. Start with a high-quality base coat to protect your nails and ensure smooth application. For the main color, opt for milky tones such as soft whites, sheer pinks, or neutral beiges that create a clean and luminous foundation. If you’re replicating a chrome or shimmery glaze, look for pearlized top coats or iridescent powders designed to give that signature shine.
When using gel products, ensure you choose a soak-off gel polish color in a similar soft, neutral shade paired with a long-wear, high-gloss top gel for durability and radiance. Some popular brands offer specialized “glazed effects” nail polish lines, which simplify the process by combining pigmented polish with a subtle shimmer. Additionally, holographic or chrome-effect gels can be layered to enhance the reflective look, perfect for professional precision or DIY artistry.
Chrome powders and applicators
Chrome powders are a versatile tool for achieving a striking, mirror-like finish that elevates any manicure. When applied over cured gel polish, these ultra-fine powders create a reflective, metallic effect that can range from subtle shine to bold, futuristic looks. To use chrome powders effectively, you’ll need a high-quality applicator, often a foam or silicone makeup sponge, to gently press and buff the powder onto the tack-free top coat. For the best results, ensure the base color complements the desired chrome effect, such as black for intense contrast or white for a softer, pearlescent glow. Seal the design with a no-wipe top coat to preserve the mirror finish, ensuring durability and extending the polish’s life. Popular brands focus on easy application and long-lasting impact, making chrome powders an essential addition to any nail art collection.
UV/LED lamps and other equipment
UV/LED lamps play a pivotal role in curing gel polish, ensuring a hardened, glossy finish in a fraction of the time compared to traditional drying methods. LED lamps are often preferred over UV lamps due to their faster curing times and energy efficiency, although both are effective. The wattage of the lamp is a critical factor; a higher wattage, such as 36W or above, provides quicker and more consistent results. Beyond lamps, other essential equipment includes nail buffers and files for prepping the nail surface, cuticle pushers for proper nail bed care, and cleaning wipes or alcohol pads to remove residue for a pristine application. Selecting high-quality tools enhances durability, improves application precision, and ultimately elevates the quality of nail art results.
Can you do glazed donut nails at home?

Definitely! You can achieve the look of glazed donut nails from your very own home. All you should be having are some basic starting products. For example, start off with a neutral or milky nail polish and top it up with a cuticle butter. Buff and file the nails after using a base coat, and once you finish the filing, use a fine shimmer powder over the nails. Once you are done applying it, remember to use a top coat. After using a top coat, put your nails under a lamp – voila, you have a quality salon finish.
DIY glazed nail tutorials
Tidy Up Your Nails: Always ensure that your nails are clean. Start with a basic manicure procedure, trimming and shaping your nails with a file Recess cuticles and buff the surface of the nails.
Use Base Polish: Use base coat with 2 coats of sheer pink or off-white nail polish and leave your nails to dry completely before applying the polish. Make sure every layer is entirely dry before going onto the other steps.
Introduce the Glazed Effect: The iridescent finish is the first sign of the signature iridescent look – Say goodbye to Chrome powder and simply rub pearl shimmer powder onto polished nails with your finger or an applicator to achieve great results.
For a great finish, go over the layers with a clear nail polish, once finished apply a UV/LED nail lamp on your nails. If you don’t have a nail lamp another alternative would be to use a fast-drying gel top coat.
This approach is very simple yet elegant allowing you to achieve a salon standard manicure in the comfort of your own household.
Pros and cons of at-home application
Pros
Cost-Effective: DIY nail techniques save money compared to regular salon visits, making it an affordable option for maintaining stylish nails.
Convenience: You can achieve professional-looking results at your own pace and from the comfort of your home, avoiding the need to schedule appointments.
Creative Freedom: Experiment with colors, designs, and techniques to customize your nails according to your preferences.
Cons
Learning Curve: Mastering certain techniques, like applying powder or curing gels, may require practice and patience to achieve salon-level precision.
Initial Investment: Purchasing tools like UV/LED lamps, powders, and quality polishes can be costly upfront.
Time-Consuming: DIY applications may take longer than a salon visit, especially for beginners, as creating the perfect look involves multiple steps.
Balancing these factors can help you decide whether at-home nail applications align with your lifestyle and beauty goals.
Alternatives for achieving a similar look
If at-home nail applications seem daunting, there are several alternatives to consider that can still provide a professional and polished look:
Press-On Nails: Modern press-on nails are an affordable and quick option, offering a wide variety of designs, lengths, and finishes. They are easy to apply and remove, making them perfect for temporary use or special occasions.
Gel Nail Strips: These strips are pre-designed gel coatings that adhere directly to your nails. They are simple to use, requiring minimal tools like a UV lamp to set the finish. Gel strips offer salon-quality results with less time and effort.
Natural Nail Care: For a more low-maintenance approach, focus on improving the health and appearance of your natural nails. Using cuticle oils, nail strengthened, and clear polishes can create an elegant, glossy look without artificial enhancements.
Professional Nail Services: Visiting a salon remains the most reliable way to achieve intricate designs or long-lasting finishes with minimal hassle. While more expensive, it ensures precision and durability.
Each option comes with its own benefits, allowing you to choose what best suits your needs, budget, and maintenance preferences.
How long do glazed nails last and how to maintain them?

Glazed nails typically last around 2 to 3 weeks, depending on factors such as the application method, nail care routine, and daily activities. To maintain them, avoid harsh chemicals, wear gloves when doing chores, and moisturize your nails regularly to prevent dryness. Scheduling touch-ups or applying a clear top coat every few days can also help extend their shine and durability.
Average longevity of a glazed manicure
The average glazed manicure lasts about 2 to 3 weeks with proper care. Longevity largely depends on the quality of the application, your nail’s health, and how you maintain them. To keep the glaze intact, protect your nails by wearing gloves during chores, use cuticle oil to ensure hydration, and avoid exposing them to harsh chemicals. Regular maintenance, such as reapplying a clear top coat every few days, can help preserve their glossy finish and overall durability.
Maintenance tips for extending wear time
To maximize the lifespan of your glazed manicure, follow these essential tips:
Protect your nails during household tasks – Always wear gloves while cleaning, washing dishes, or gardening to prevent chips and damage caused by exposure to water and harsh chemicals.
Moisturize regularly – Use cuticle oil daily to keep your nails and surrounding skin hydrated. This prevents dryness and brittleness, which can lead to cracks or peeling.
Avoid using nails as tools – Refrain from opening cans, scratching surfaces, or performing tasks that strain your nails, as this can weaken the glaze.
Reapply a top coat – Refresh your manicure by adding a clear top coat every few days to reinforce the shine and prevent premature chipping.
Limit exposure to excessive heat – Steer clear of prolonged hot water exposure or high-temperature environments like saunas, as it can compromise the glaze’s adhesion.
By incorporating these simple practices into your routine, you can maintain the vibrant, glossy look of your glazed manicure for weeks.
Proper removal techniques
Removing a glazed manicure properly is crucial to protect your natural nails from damage. Start by gently filing the top layer of the glaze with a fine-grit nail file to break the seal, ensuring you only remove the glossy surface. Next, soak a cotton ball in acetone and place it firmly on each nail, securing it with aluminum foil or nail clips. Leave it on for 10-15 minutes to allow the acetone to soften the glaze. Afterward, use a wooden cuticle stick or a gentle pusher tool to carefully lift off the remaining polish. Avoid forceful scraping, as this could harm the nail bed. Lastly, wash your hands thoroughly, apply a nourishing nail oil, and follow with a hydrating hand cream to restore moisture and keep your nails healthy.
What are some variations of the glazed donut nail trend?

The glazed donut nail trend offers endless versatility, allowing for creative interpretations. Popular variations include incorporating soft pastel or neutral base colors, such as blush pink, lavender, or nude, to create a subtle and elegant look. For a bolder twist, metallic or chrome finishes like gold, silver, or rose gold can be layered with the glaze effect for added dimension. Additionally, some enthusiasts mix in glitter or holographic powder to enhance the shimmer, while others experiment with ombre effects to blend multiple hues seamlessly. These adaptations make the trend highly customizable and suitable for any occasion or personal style preference.
Color variations: pink, nude, and white chrome
Pink chrome offers a playful yet sophisticated aesthetic, making it a popular choice for those who enjoy vibrant yet refined manicures. It pairs well with both subtle and bold accents, suitable for weddings, parties, or casual settings. Nude chrome, on the other hand, leans towards a timeless, understated elegance that complements any outfit or occasion while maintaining a modern edge. This variation is perfect for minimalists or professionals seeking a polished look. White chrome radiates a clean and futuristic vibe, often giving an iridescent, pearl-like glow. It’s a go-to choice for bridal nails or anyone looking to achieve a crisp, luminous finish. These options showcase how chrome tones adapt to individual preferences and occasions, ensuring a flawless, eye-catching result.
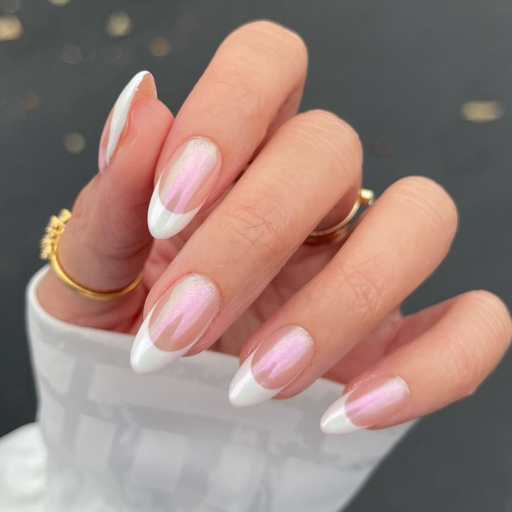
Glazed French tips and other nail art ideas
Glazed French tips are a modern twist on the classic style, combining the timeless elegance of French manicures with a glossy, luminous finish. This design typically features a soft, translucent base paired with pearlescent or chrome-like white tips, making it versatile and stylish for any occasion. You can customize the look by experimenting with different base colors or adding a touch of glitter for extra sparkle.
Other trending nail art ideas include ombré chrome nails, where two or more shades seamlessly blend for a gradient effect that is both trendy and sophisticated. Negative space nail designs, which strategically leave portions of the nail bare, create a chic and artistic appearance. Finally, adding subtle embellishments like micro-pearls, metallic accents, or minimalistic geometric patterns can elevate your manicure without overwhelming the overall look. These options allow for endless creativity while maintaining a fashionable edge.
Seasonal adaptations of the trend
Seasonal changes provide the perfect opportunity to tailor nail art trends to fit the mood and vibe of the time. During spring, pastel chrome tones such as lavender, mint green, and peach dominate, reflecting the fresh and uplifting energy of the season. Summer nails often take on bolder chrome colors, like vibrant pinks, golds, and turquoise, sometimes paired with tropical patterns or glitter that mirrors the playful and sunny days ahead. When fall approaches, warm metallic hues such as copper, bronze, and deep reds become popular, evoking the cozy and earthy feel of autumn. Winter trends lean into cool silver, icy blues, and white chrome tips, often accented with snowflake designs or crystal embellishments to celebrate the frosty, festive atmosphere. Adapting your nail art to the seasons not only keeps your look relevant but also ensures a fun and creative way to express your style year-round.
Are glazed nails suitable for different nail shapes and lengths?

Yes, glazed nails are highly versatile and suitable for various nail shapes and lengths. Whether you have short, medium, or long nails, the glossy, luminous finish of glazed nails enhances their appearance. This trend complements classic shapes like square, oval, and round, as well as more dramatic shapes like almond, coffin, and stiletto, ensuring a chic look for everyone.
Best nail shapes for the glazed look
When it comes to showcasing the glazed nails trend, certain nail shapes tend to stand out. Almond nails are a top choice due to their elegant, elongated shape, which highlights the reflective finish beautifully. Coffin nails, known for their edgy yet sophisticated appearance, also pair well with the glossy sheen, accentuating the light-catching effect. Meanwhile, oval nails offer a versatile and timeless option, ensuring a chic application of the glazed look for both everyday wear and special occasions. However, this trend remains adaptable, making it equally stunning on other shapes like square or stiletto, ensuring there’s a perfect match for everyone’s preferences and nail structure.
Adapting the trend for short and long nails
Adapting the glazed nails trend for both short and long nails is entirely possible, allowing anyone to enjoy its sleek and modern aesthetic. For short nails, oval or round shapes are ideal as they naturally elongate the fingers and enhance the reflective finish. Using lighter, neutral shades like soft pinks, nude tones, or pearlescent whites creates an elegant and understated look that complements the shorter length. Long nails, on the other hand, provide more space to experiment with bold shapes such as almond, coffin, or stiletto. These elongated styles beautifully amplify the light-catching effect of the glazed finish. No matter the nail length, proper preparation, including smoothing and buffing the nail surface, ensures a flawless application that maximizes the trend’s glossy appeal.
Combining glazed nails with other nail enhancements
The glazed nails trend seamlessly integrates with various nail enhancements to elevate its allure. For a modern, multidimensional effect, consider pairing the glazed finish with subtle nail art like abstract lines, delicate foil accents, or minimalist designs. Those seeking a luxurious touch can incorporate rhinestones or glitter along the edges or as accent details. Glazed nails also complement enhancements like gel extensions or acrylic overlays, which provide an ideal foundation for the reflective finish while offering added durability and structure. For extra creativity, opt for ombre effects or chrome powders to layer over the glazed look, blending trends for a striking appearance. Whether subtle or statement-making, combining glazed nails with other enhancements allows unlimited personalization and sophistication.
References
Frequently Asked Questions (FAQ)
Q: What are Glazed Donut Nails and how did they become popular?
A: Glazed Donut Nails are a trendy manicure style popularized by Hailey Bieber. This look features a shiny, iridescent finish that resembles a glazed donut. The trend gained massive popularity after Hailey Bieber showcased her glazed donut nails at the Met Gala, sparking a wave of interest in this unique and eye-catching nail style.
Q: How can I achieve the Glazed Donut Nails look at home?
A: To create Glazed Donut Nails at home, start with a light pink or baby pink gel polish base. After curing, apply a thin layer of white chrome powder using a special applicator. Seal with a top coat and cure again. For the signature glossy finish, add a final layer of clear gel top coat. While it’s possible to DIY, visiting a nail salon might be easier for achieving the perfect glazed effect, especially if you’re new to using nail products like chrome powders.
Q: What type of nail shape works best for Glazed Donut Nails?
A: While Glazed Donut Nails can work on various nail shapes, they are often seen on almond-shaped nails. The almond shape complements the sleek and elegant look of the glazed finish. However, you can also achieve this trendy mani on other shapes like oval, square, or even short nails. The key is to ensure your nails are well-maintained and shaped to your preference before applying the glazed effect.
Q: Is it necessary to use gel polish for Glazed Donut Nails?
A: While it’s not absolutely necessary, using gel polish is highly recommended for achieving the best Glazed Donut Nails look. Gel polish provides a smooth, even base and allows for easy application of the chrome powder. It also ensures a long-lasting manicure. If you don’t have access to gel polish or a nail lamp, you can try using regular nail polish with a quick-dry top coat, but the effect may not be as durable or glossy as with gel.
Q: Can Glazed Donut Nails be done on acrylic nails?
A: Yes, Glazed Donut Nails can be done on acrylic nails. In fact, acrylics can provide an excellent base for this trendy manicure. After applying and shaping your acrylic nails, follow the same process of adding a light pink gel polish, chrome powder, and top coat to achieve the glazed effect. This combination can result in a stunning and long-lasting Glazed Donut manicure.
Q: How long does a Glazed Donut manicure typically last?
A: A professionally done Glazed Donut manicure can last anywhere from 2 to 3 weeks, depending on how well you care for your nails. The longevity is largely due to the use of gel polish and proper application techniques. To extend the life of your mani, avoid harsh chemicals, wear gloves when doing household chores, and moisturize your cuticles regularly. If you notice any chipping or lifting, it’s best to have it touched up or removed by a professional to maintain the health of your natural nails.
Q: Are there any variations of the Glazed Donut Nails trend?
A: Yes, there are several variations of the Glazed Donut Nails trend. While the original look features a light pink base, you can experiment with different base colors like nude, white, or even pastel shades. Some popular variations include “Chocolate Glazed Donut Nails” using a brown base, or “Strawberry Glazed Donut Nails” with a soft red or pink hue. You can also play with different chrome powders to create unique pearlescent or iridescent effects while maintaining the signature glossy finish.


