French tip nails have long been celebrated for their timeless elegance and simplicity. However, the modern era of nail design has given this classic look a colorful and creative overhaul, making it a popular choice for those seeking a bold yet sophisticated touch. This blog explores the evolution of the French manicure, showcasing how vibrant hues, innovative patterns, and unique techniques have redefined this traditional style. From subtle pastel gradients to striking neon tips, we will examine the latest trends, application methods, and tips for achieving the perfect colorful French manicure that suits any occasion. Whether you’re a nail art enthusiast or a professional technician, this guide will provide valuable insights into mastering these artistic designs with precision and flair.
What are colored French tip nails and how do they differ from classic French manicures?
The evolution of French manicures: From classic to colorful
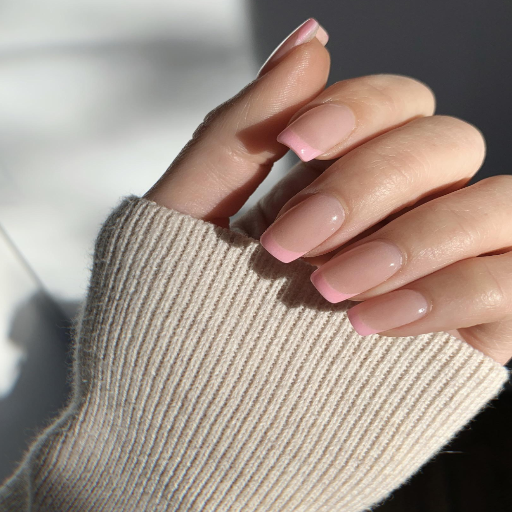
As it becomes more and more popular, I understand why French manicures have evolved. Its intriguing classic feature’s so-called French effect. Set on a neutral or pale pink base, a precise white tip completes it. This specific design they wanted to achieve is that it embodies elegance which is hard to achieve and has to be done with precision such as the use of nail striping brushes and white pigment polishes.
The reverse-colored French tip combines all of the colors imaginable, such as a pastel, metal, or even a neon color, which breaks the norm of the ordinary French tip nail. In a sense, this increased range of evolution does bring more formulation and finish requirements to the table, such as:
- Pigmentation Levels: Highly pigmented polishes are needed to ensure brightness, whilst only having to apply a single layer.
- Durability: They are also expected to retain their shine and not chip which can easily be improved upon using long-wear formulas.
- Application Techniques: More complex techniques are needed in cases such as ombre nails or when blending.
- Compatibility with Nail Shapes: Different colored tip designs fit better with different nail shapes i.e. bold tips look stunning on an almond, coffin, or a stiletto-shaped nail.
All in all, the shift towards a colorful French tip manicure allows for all sorts of art to be created while still keeping hold of the techniques and standards that the French manicure is known for.
Popular color combinations for modern French tip nails
When it comes to doing your nails with a classic French tip, these are some of the trends that people love the most:
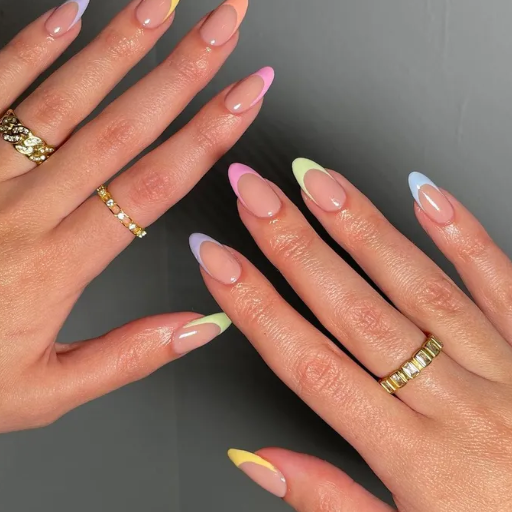
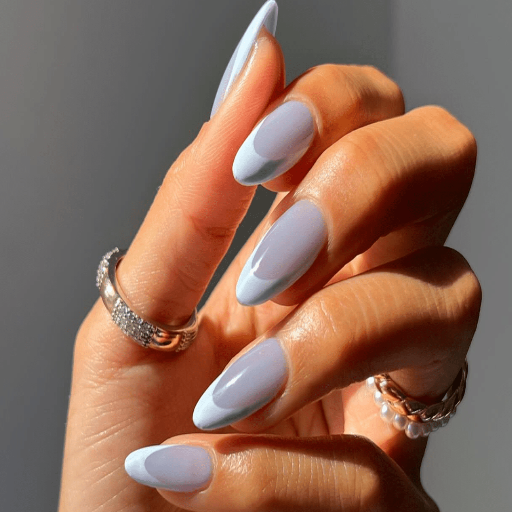
- Pastel Shades: To achieve a subtle cute effect, combining colors such as lavender, baby blue, and mint green can be used. For sure, pastels are ideal for those almond-shaped nails and they add elegance to the entire style without being overwhelming.
- Neon Mixes: There are daring tips such as bright neons which include electric pink, lime green, and UV yellow. They are ideal for coffin or stiletto nail tips because their sharp edges are an incredible plus.
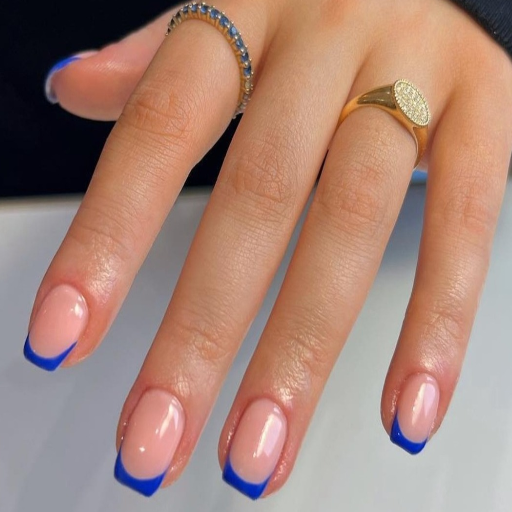
- Monochromatic Gradients: To achieve a touch of elegance, using gradients of a single color, like navy to royal blue, is the way to go. marrying a negative space design with this gradient can emphasize the modern clean and minimal look.
- Metallic and Nude: Metallic colors like Gold, silver, or rose gold on the base of the nude will look stunning, effective, and perfect for minimalist style. For square or ballerina nail shapes this combination would suit great as it’s achieving a modern look and style.
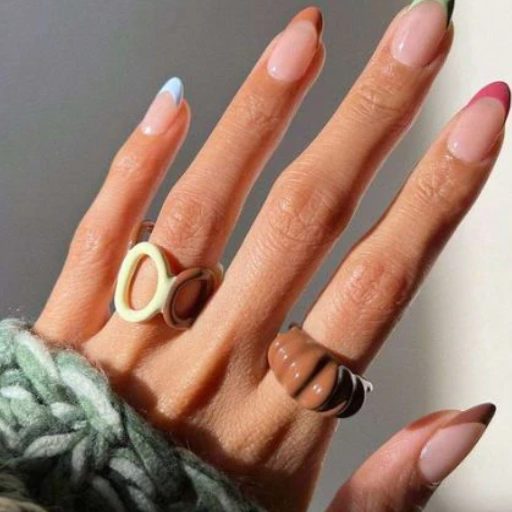
- Contrasting Opposites: Focusing on using colors that are on opposite ends of the color chart such as red and teal or black and white will look very stylish, especially while doing the French tip with sharp geometric curves.
Every combination has a distinct blending or line-forming methodology to guarantee perfect results. The nail aesthetics together with the use of nail polish and necessary tools e.g. brushes and stencils play a major role in the professional outcomes.
How can I create colorful French tip nails at home?
Essential tools and products for DIY colored French tips
Creating a colorful set of French tip nails at home isn’t too complicated if one has all the necessary tools and products to pull it off accurately. So, here’s what I make use of:
- Nail Polish Colors: Always have at least two opaque colors that are either contrasting or complementing
- Base Coat: A sticky base coat with adhesive properties (one that takes around half a minute to 1 minute to dry) which will protect the nail and also help the polish last longer
- Top Coat: A coat that dries quickly, has a sheen, and is of good quality to ensure the design is sealed and has a long life.
- Fine Nail Art Brush: To color the dots and apply the tips accurately, the length of the brush’s bristles should not exceed 3 mm.
- French Tip Nail Stickers or Stencils: Nice, even curves can be achieved with these, and the adhesive strength is enough to stick the sticker in place without taking off the polish underneath it.
- Nail File and Buffer: These are important when you want to shape your nails and even the surface of the polishing area before starting with the polish. You can use a file with 180 to 240 grit for most purposes.
- Acetone or Nail Polish Remover: For edge cleanup or fixing mistakes, acetone is satisfactory for quick removal, but due to the risk of polish losing, usage should be adequate.
- Cuticle Pusher: The cuticle pushers ensure that the nail area is clean and ready so that the polish goes on even without leaving unsightly lines.
I can apply vibrant French tips without the risk of an uncontrollable purchase by waiting for all of these tools to arrive and following a step-by-step application.
Step-by-step guide to achieving the perfect colorful French manicure
- Nail Preparation: Start by cleaning up your nails and forming them into your desired shape using a nail file. Kindly ensure that the edges are smooth in order to avoid chipping that may occur later on. For the polish to stick, use a buffer on the nail surface to gently sand and disable shine. Lastly, wipe your nails using alcohol wipes to get rid of any oil or dust on your hands.
- Base Coat Application: Each nail should get a base coat that is thinly and evenly applied to them. It is vital for the process as it helps a smooth surface to be created on the natural nail thereby preventing it from getting stained. Conclusively, allow the base coat to dry completely or apply it under a lamp for 30-60 seconds if a gel product is being used.
- Creating a Tip Guide: There are different ways how a tip area can be defined so polish can be applied. Nail guides, adhesive strips or free hand can be used when denied in a professional manner. From a professional point of view, symmetry and precision should always be in check.
- Colored Tips Applications: For better precision, choose your desired polish color and carefully apply it to the tip of each nail with a fine brush or a polish that has a thin applicator. If spacer polish is being used, keep each layer of polish under a 48W UV/LED lamp for 30 to 60 seconds to ensure all of it has been set properly.
- Make Corrections: Load your angled or fine nail brush with acetone and trim the areas around the edges ensuring the tips are in the correct shapes. Correctness in this part makes the whole work neater.
- Apply a Top Coat: Your work now needs a top coat polish ensuring that the tips of your nails are also stressed. It additionally improves the shine and endurance of the manicure and safeguards the design. If necessary, UV/LED lamp cure the top coat after applying it (30–60 seconds for gel polish) or wait for regular polish to dry completely.
- Maintenance: After it has dried cuticle oil should be slumped into the area around the cuticle with the idea of moisturizing the skin and making the work more of a professional and clean finish. To increase the effectiveness of the manicure, do not soak your hands in warm water (terrain) for more than 24 hours, and wear gloves when doing chores.
Each one of you will be able to achieve perfect colorful French tips just as if you walked out of a nail salon whilst maintaining the health of the nails and polish.
Tips for maintaining your colored French tip nails
- Protect Your Nails: It’s important to not get your nails too wet as this can weaken the bond between the nail polish and the turpentine. Water can be very harmful as well; while upholding its usage, use gloves while washing dishes or doing things like showering.
- Don’t Forget the Top Coat: Getting a manicure is like dressing up, you want to shine. To maintain the sheen and durability level of your manicure, don’t forget to add a generous coating of top coat at regular intervals to add an extra layer of shine and depth.
- Don’t use your nails as tools: Nails shouldn’t be used for manual labor, using them to open boxes, scraping objects and opening packages can cause damage to the polish that is on the nail. When possible, make proper use of grooming tools, there is no shame in that.
- Moisturize: moisturized skin prevents dryness and peeling and maintains the overall look of a manicure, keep the skin around the nails hydrated by applying hand cream and cuticle oil every now and then.
- Caution when it comes to chemicals: Household cleaning products and chemicals can not be good if they get exposed to nail polish, they can destroy the look and feel. Try going for milder options whenever possible, or consider wearing gloves.
- File And Shape When Necessary: Sometimes, small chips and rough edges can develop while wearing polish, in such cases use a fine-grit file to even them out, as it will polish the nails without interfering with the remaining polish.
By adhering to these meticulous maintenance practices, you can significantly enhance the durability and aesthetic appeal of your colored French tip nails while promoting overall nail health.
How can I customize colored French tips for different nail shapes and lengths?
Adapting colored French tips for almond, square, and coffin nails
While applying colored French tips to different nail shapes and lengths consider the proportions, curvature, and area for a pleasant look of each nail type. I’d go as follows with them:
- Almond nails: These nails are not only pointy but converge towards the tip making them elongated. For the almond nails, I suggest French tips to be colored the same way the curve goes while the nail contours. The tip can cover about 20-30 percent of the nail length which creates balance. A fine brush is particularly useful for precision here.
- Square nails: Square nails have straight edges and the tips are flat which brings out a modern look. For this shape, I advise a French tip having the color across the tip and the tip edge making the lines neat and sharp. In order to balance out the shape and not make it look too bulky, I recommend ensuring the thickness is the same as the width of the nail. Most of the square nails feel right if the thickness is between 1.5-2 mm.
- Coffin nails: Nails that have a narrow and flat end and are elongated in shape as they taper at the base giving them a unique and beautiful overall look are the coffin nails. To match the narrowed tip of the coffin nail, the colored French tips should be cut in a tapering fashion. It is recommended to create a gradient or ombre effect with dear to achieve the desired classy architectural appearance where roughly 25-35% of the total nail length is covered this will enhance the details of the nail even more.
In this way, by adding color to the tips and getting them modified to go around the structure of the nail type, the ending result will still keep a professional touch while making them stand out elegantly.
French tip designs for short nails: Making a statement with less space
With appropriate modifications, French tip designs are still able to make a recognizable statement through the usage of proportion and contrast along with color on short nails.
- Narrow or Micro Tips: Short nails can benefit from thin nails as they provide size interaction without overpowering the nail base. A 10-15% coverage of the nail length provides a sense of equilibrium when looking for balance.
- Color Modifications: The tips can be painted wide and metallic which stands out and calls for attention. Darker shades at the tips and neutral colors at the base are good combinations in order to increase pop.
- Simple Designs: To avoid cluttering the smaller surface area, move over to more advanced designs like diagonal tips, double lines, or negative space. Design edges and Architecture also aid this process by lending features like symmetry and perfect angles.
By optimizing these and tailoring them to short nails, it is possible to make a significant style statement while respecting the physical and aesthetic limitations of the nail length.
Creating the illusion of longer nails with strategic color placement
Sitting down at the nail salon, some people speculate why painting the whole nail surface might not be ideal, but the truth is there is something called ’strategic color placement’ that plays a very crucial role. It involves ideas like ombre nails or even darker colors in the middle of the nail which helps extend the visual profile. Negative space nail art which involves leaving the edge of the nails bare or even a single stripe down the middle also helps enhance the length illusion as well. Last but not least, using high gloss nails is also important in establishing more of a sleek and tacky-looking nail as it adds more depth to the design as well.
- Color Selection: Complement Optimizer lengthening effects by surrounding space shades with darker or more neutral tones in the Center patterns.
- Symmetry and Alignment: To ensure clean designs, vertical gradients, and images need to be both symmetrical and correctly aligned.
- Texture and Finish: A semi-gloss or high gloss topcoat provides depth and matte areas can be painted over them strategically to highlight the focal points.
- Negative Space Precision: The ratio of painted and unpainted sides should be proportionate and well-balanced.
These methods are widely recommended across professional nail art resources for their proven ability to transform shorter nails effectively and aesthetically.
What are some creative variations on the colored French tip trend?
Glitter and chrome accents: Adding sparkle to your French tips
Glitter accents may also be used in a gradient effect towards the nail tip or completely on the plain colored base which gives a beautiful shine effect. We should prefer a fine chrome powder for the tips showing a mirror surface top which can also be done by using high-quality chrome powders.
- As for which size of glitter to use: Microfine glitter is best to achieve a smooth „finish“ while bigger glitter particles can be used to achieve a chunky effect, however, large particles should be sealed with a strong top coat.
- For Chrome Application Process: The process begins by applying gel polish which is UV/LED cured, ensuring a smooth tack-free surface then rubbing in the chrome powder using an applicator. Finish off by sealing it with a strong top coat.
- For UV/LED curing time: The curing times by most brands are between 30 to 60 seconds depending on the lamp wattage but ensure that the gel product and the curing device work together.
This approach to French tips allows for creative experimentation while maintaining precision for a clean, polished finish.
Negative space and geometric designs in French tip nail art
Negative space and geometric designs create French tip nails in a modern and more minimalistic form of art through parts of the nails that are left unpainted or use angular designs. To achieve this technique perfectly, it is essential to beforehand position the idea of negative space as a way of creating an ideal effect with the negative lines that are created by the angular shapes. With defined edges using high-quality nail tape or detail brushes, this will allow you to incorporate sophisticated triangular, linear, or asymmetrical shapes into your design without too much hassle.
- For the base coat: ensure this is neutral in color to promote adequate stickiness devoid of colours that would interfere with the design.
- For taping: use nail striping tape to promote accuracy during the creation of the geometric shapes.
- For Polish application: ensure that layering of colors, as well as the application of gel polish together with curing, is done as stipulated otherwise the design will ruin.
- For a top coat: apply either a matte coat or a glossy coat to lengthen the lifespan of the design made.
In order to achieve results that look professional and to be in line with the current trends, there is a need for accuracy in the use of the recommended tools whilst also being patient.
Incorporating nail stickers and decals into your French tip manicure
A very helpful and effective approach to making French tip nails more interesting while still keeping the fine details intact is the use of nail stickers or decals. As per the information provided by the leading websites, these elements should ideally be applied after the base color has completely dried or cured for better adhesion on the nails. You are also advised to ensure that the decals are softly pressed with a silicone tool so that no air is trapped and a smooth finish is obtained.
- Base Polish Compatibility: Make sure that the stickers or decals you select are the least peeling by checking that the design works with the base polish provided either regular or gel. Check the product features to confirm their adhesive combinations.
- Sticker Size: Ensure that you choose good quality stickers that are not bulky but still thick enough for durability and lie between the ideal range of 0.05mm to 0.1mm. Thinner decals are unnoticeable; the thicker ones are easier to use for the first timers.
- Top Coat Sealant: Use one or two coats of a clear, solvent-proof top-up that is high resin for more resistance in order to secure the design and reduce the chances of chipping.
- Curing Process or if applicable: When gel polish is used, use a UV/LED lamp for the suggested time by the manufacturer to seal the design.
She should easily accomplish a beautiful clean professional-looking French tip manicure with the help of stickers or decals. Use the required tools and finishes that will satisfy the needs of the market while also ensuring the product lasts.
How can I choose the best-colored French tip design for my skin tone?

Complementary colors for warm, cool, and neutral skin tones
To help you choose the best-colored French tip design for your skin tone, it is important to understand the ones that are best suited for your natural skin complexion.
- Warm Skin Tones: If your natural skin tone is warm in nature, then go with warm peach, gold ,and pink nail polish. Terracotta shades and muted orange shades also complement the warm tone. When applying the nail polish, choose a warm-based pigment ratio so that the colors blend in beautifully.
- Cool Skin Tones: If your skin tone is a cool pale blue or pink, it is preferred to use nail polish in icy pink, mint green, baby blue, or lavender as they are cooler toned and neutralize the colors. Usually, such colors look great together. Invest in a high-quality formula that contains fine cool-toned pigments to enhance the vibrance of the nail polish, while providing even coverage.
- Neutral Skin Tones: Neutral skin tones can mix and pair well with most colors. For a more elegant chic look go for light pastel shades bunt, light nudes, or shimmery champagne tones, or for a bolder move, you can go for the darker shades of red, navy blue, and emerald. It is better to apply polishes that are consistent in neutral undertones for optimal versatility.
As you choose your polish, be sure to check the pigment classification and any finish specifications, be they matte, glimmer, or gloss, so that they are consistent with the design intent. Focus more on good quality formulations to achieve smooth chips-free results.
Universal shades that flatter all skin tones in French tip designs
It is important to remember that when selecting nail polish shades for the French tip on every skin type, the aim should be the bare and universally workable color shades. For instance, soft pink, ivory, or light beige nail polish colors are perfect because they can go with many skin undertones. One of the advantages of these tones is that they certainly bring a clean and classic look while buffering the design from being too ostentatious to mix with multiple looks.
- Opacity: Medium to high formulas that are opaque should be preferred to avoid streaking in the end. The end polish should not appear sloppy or bare in any area.
- Undertones: Select polishes with a shade that is not too warm or cool to suit any skin type.
- Finish: French tips can go well with gloss or semi-gloss where they can be shiny and strong, but if the event calls for it then matte is also a very stylish option for nail polish.
In summary, polishes with warmer undertones work for a wide range of skin colors while not drawing too much attention to the nails and complimenting the standard French style designs. These colors are practical and elegant and perfect for any occasion.
Reference sources
Frequently Asked Questions (FAQs)
Q: What are colorful French tip nails, and how do they differ from traditional French manicures?
A: Colorful French tip nails are a modern twist on the classic French manicure. Unlike traditional French tips that use white polish, these designs incorporate various colors, from neon to pastel hues, for the tips.
Q: What are some popular color combinations for colorful French tip nails?
A: Popular color combinations include pastel French tips on a nude base, neon tips for a bold look, and ombré effects using complementary colors. Some trendy options for 2023 and 2024 include hot pink tips on a neutral nude base, rainbow tips for a playful vibe, and metallic or holographic tips for added glamour.
Q: How can I achieve a perfect colorful French tip at home?
A: To create colorful French tips at home, start with a clean, well-shaped nail. Apply a base coat, then use nail guides or a steady hand to paint the tips in your chosen color. For precise lines, use a thin brush, pin, or toothpick. Seal with a top coat for longevity.
Q: Are any specific nail shapes that work best for colorful French tips?
A: While colorful French tips can work on any nail shape, they’re particularly striking on almond-shaped or long square nails. These shapes provide more space for creativity and allow the colorful tips to stand out. However, shorter nails can rock this trend with thinner, more subtle tips.
Q: What are some unique variations of the colorful French tip trend?
A: Some unique variations include: – Outline French tips, where only the outline of the tip is colored – Drippy French tips, creating a melting effect – Floral or lemon accents added to the tips – Double French tips using two different colors – Reverse French tips, where the color is applied at the base instead of the tip
Q: How can I make my colorful French tip manicure last longer?
A: To extend the life of your colorful French tip manicure, always use a good quality base coat and top coat. Apply thin layers of polish to prevent chipping. Wear gloves when doing household chores, and moisturize your cuticles regularly. Using long-lasting gel polish or getting a professional manicure can also help your colorful French tips stay perfect for longer.
Q: Are colorful French tips suitable for all occasions?
A: Colorful French tips can be adapted for various occasions. Pastel or subtle metallic tips can add sophistication to a work or formal look, while neon or bold colors are perfect for parties or casual events. The versatility of this trend means you can adjust the colors and width of the tips to suit any occasion, from a retro vibe to a modern, eye-catching statement.


