Undoubtedly, the holiday season is a busy time for raising the festive flag. However, there is no better way to express this than through your nails if you love the holiday spirit as much as I do. Christmas and a specific candy cane are inseparable. In fact, they have become a massive part of themed manicures during the Christmas season. This blog will help you explore some of the most beautiful designs based on candy canes to enhance your celebration this season. We have it all, whether it’s slightly touching a couple of red-and-white stripes, boldly decorated nails with glitter, or metallic. Sit back and relax as we go through how to perfect the candy cane nails for the season.
How to Create Basic Candy Cane Nail Art?
To start with the essential candy cane nail art, apply a clear polish over your nails as protection while creating a smooth surface. Once it is dry, apply two coats of white nail polish, making this the main background, but wait twice for each layer to dry before putting on the next one. Then, with the help of a thin paintbrush, slowly paint diagonal red stripes on the nail, mind that you only do it with candy canes, paint that way, cross the nail. Use a glossy red polish for striking festive colors.
To achieve clean and prominent lines, try using a nail art pen or even tape strips for more meticulous work. Once satisfied with the design, set the polish to dry completely before applying a top coat. Lastly, using one of these polish lines is simple but most effective. It should only require concentration on the right amount of polish, especially with a sprinkle of glitter or shine to accentuate the already completed work.
Selecting the Right Red and White Polish
It is critical to note appropriate formulas that need high pigmentation and stickiness for the ideal red and white polish suitable for the candy cane nail design. When it comes to polish, the correct ratio is key: A red lacquer should be vivid with an opaque touch, and coverage should be achieved in one or two usages. The same goes for a white lacquer, but a glitter variant would be the best final touch. Gel polish can be great for long-lasting results, while markers can be used for short and easy access.
Two types of reds tend to pair very well with white: polish with a true blue undertone and neutral reds. So always keep in mind the tones of red polish you choose. Moreover, some brands produce self-leveling polishes, which avoid ugly textures and make your nail design look good. When applying polish, always make sure to self-level the polish and apply base and top coats, as this adds to the beauty and shelf life of the design.
Mastering the Stripe Technique
To master this technique, you will need a lot of preparation and accuracy. The first step is to ensure the nail bed is clean and smooth and that it is applied with the right base that corresponds with the polish. Then, use a high-quality striping brush or tape to create defined lines on the nail bed because making lines is crucial. Next, use a polish that has a controlled viscosity; if the polish is too thin, it will bleed, and if it’s too thick, it will have random edges, which will ruin the design, so make sure to find the right balance. Lastly, apply the polish gently without pushing too hard, and do not use a lot of force so that it does not damage the base layer.
Adding a Glossy Top Coat for the Perfect Finish
If you don’t like the look of dull nails, applying a glossy top coat is a good idea, allowing the nails to shine and keeping the nail art intact for long periods. Put on the top coat only after the polish on the nails dries completely to avoid any drag or smudging. After you apply the top coat, use a quick-drying one to give a perfect finish to the entire nail surface. Then, paint the edges of the nails and tips as well to avoid tip chipping. Buy top coats that promise to deliver high shine and block UV sun rays to prevent your manicure from turning yellow. This should be repeated every 2-3 days to restore the coat and ensure your nails are long-lasting.
What are Some Creative Variations on Classic Candy Cane Nails?
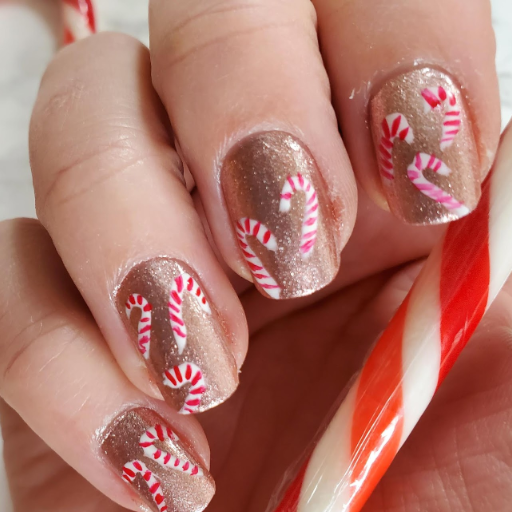
To make a basic candy cane look more eye-catching, sprinkle some glitter above it or use metallics. Metallic red colors can be used instead of classic red, or white with shimmer can be added for some pizzazz. Alternatively, the design may have an ombre effect for a more sophisticated look, wherein the red fades into white.
If you’re feeling bold, try diverging from traditional reverse Calm and turning your concentration to spirals or diagonal gradients that resemble candy canes. Pictures in further increasing patterns will also produce barely noticeable effects, like snowflakes or holly. Also, some people may wish to change the width of the stripes or mix a matte finish with a glossy finish. This will result in interesting designs without compromising on the cane’s appearance.
Incorporating Pink for a Sweet Twist
Integrating pink into the design will add more fun and a youthful, spirited distinction while at the same time retaining the classical dose of the festive feel infused with tradition. Such pink stripes or accents would add a more cute and sociable touch to the general candy cane concept, especially with red and white. This color combination is versatile enough to apply to other relatable holidays apart from Christmas. In such circumstances, it would make sense to go with more profound shade modalities like blush or rose if desired more classy look; otherwise, hot pink will lend a bold statement.
When accomplishing a color scheme that necessitates the braiding of pink, consider mixing it with silver or champagne gold to add neutrality or metallic tones. More significantly, these additions reduce the intensity of the pink and tie the entire color scheme without deviating it too far from the initial idea. Background and pink used in ribbons, festive detail, or even ornaments can all complete the theme beautifully. After detailing how one can consider incorporating pink into the design, I have no doubts that even for a festive season like Halloween, there is something sophisticated about the sweetness of the pink color.
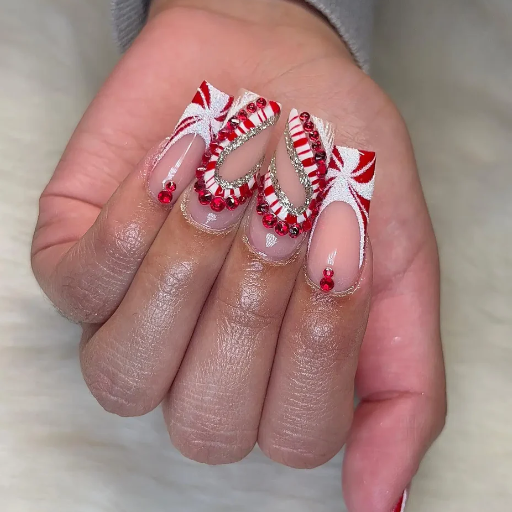
Adding Glitter for Extra Sparkle
This approach effectively enhances the appeal of holiday designs by using glitter for light reflection. Any decoration, such as ornaments, candles, or table décor, can benefit from glitter embellishment. For example, finishing touches on Christmas baubles or tree decorations with bows can enhance the look without overshadowing it. However, care must be taken to use the right glitter while working with a broader palette to avoid cluttering.
The holistic appeal of the decoration must be enhanced through the careful use of glitter across the space; this can be achieved by blending matte objects with glittered objects or applying glitter moderately. Furthermore, using quality glitter materials also benefits the durability and hygiene of the products. Overall, using glitter on decorative items, either as a complementary element on wreaths, decorative items on the mantle, or even as a design on Christmas gift wraps, significantly enhances the holiday production without making it feel too gaudy.
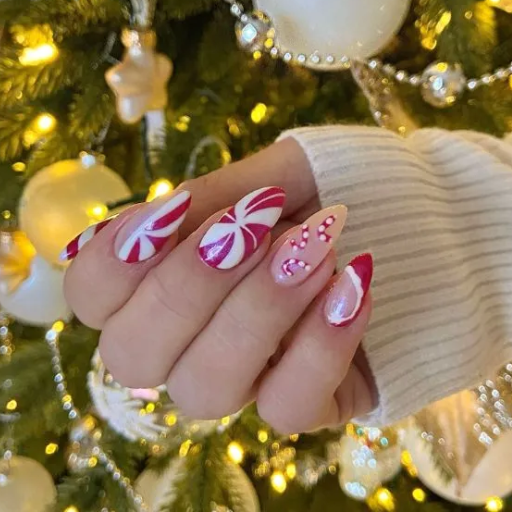
Creating Peppermint Swirl Designs
The details of creating peppermint swirl designs rely heavily on precision in symmetry, color contrast, and balance in the overall layout. It is good to start with a base color of choice, white or even a cream, which can assist in replicating the background of a regular peppermint candy. A bold contrasting color is utilized to create a recognizable effect. Red or green are the most common colors used. Make sure the swirls come from a central point to maintain consistency. The swirls are c-shaped curves evenly spaced to originate from a center point.
How to Adapt Candy Cane Nails for Short Nails?
A redesign of candy cane nail art is appropriate for powdery bite-sized nails. As opposed to a raw space, appeal is being purposed; thus, keeping the two or three swirls per nail approach would be ideal. This way, even only one or two of the candy take steps would suffice to embellish the nail.
Moreover, one could also try using accent nails rather than overloading on the candy cane nail art. This can be done by painting one or two nails in red and the remaining two in white, all the while applying the candy nail only to selected nails. For people with shorter nails, using the swirls helps induce the desired effect without making the design overly crowded. Use glitter strips for nail art for the swirls, and add a top coat for extra shine and design.
Miniature Candy Cane Accents
Candy canes were chosen to accent my small nails because they are intricate and festive. The first coat must be filled with a neutral color, not red or white. Such neutral colors include pale pink or nude. After the base coat dries, painting the diagonal lines with striping brushes or nail art pens should be done. It is recommended that they be painted evenly. With this detail, consistency in the pattern can also be achieved.
Silver or gold striping can be added to the base to give the design a modern touch. However, this does not take away the holiday feel of the nails. Finally, a topcoat should be applied to uphold the designs. This can also give the nails an overall professional feel. This cohort of ideas is ideal for making beautiful holiday nails and is pretty easy to execute.
French Tip Candy Cane Designs
Precision and consistency will enable you to achieve a professional nail finish when creating candy cane French tip designs. Start off with a professional tip polish, opaque white, as it provides a nice base for the design. Then, painting the red diagonal stripes is the next step, maintaining an even distance between the lines to achieve proper candy cane aesthetics while using a detailing brush or tape to achieve the desired diagonal lines. Upon completing the red stripes, focus on proper spacing with adequate stripe thickness, thick between the 1-2 relatives to the nail size for symmetry across the stripes. To refine the design, you can place alternating metallic lines of either gold or silver between the red stripes, but ensure they are slender enough, about 0.5 mm, corresponding to the position of the stripes, so they do not ruin the design.
To maintain the appearance of the design while reinforcing it, consider applying a high-gloss topcoat, which will also enable the colors to pop out without diminishing the aid of the topcoat in preventing chipping of the design. If the aim is to have an application that will last longer while providing extra support, use gel polish and seal the project with an LED or UV lamp. Because French tip designs complement the nails beautifully, proper execution and attention to detail enable one to create stunning nail art designs and turn them into a collage for the season.
What are some fun Christmas nail art ideas that incorporate candy canes?

Nail art inspired by a candy cane is whimsical and classy during the festive season. Many prefer a candy cane pattern in which red and white diagonal stripes are used alternatively. To further the appeal, one can place silver, gold, or glitter accents between the stripes to bring out a hint of shimmer and further the holiday spirit.
Another direction to explore is a candy cane accent nail with minimalistic colors on the other nails. Such a combination requires using glittery green or gold as the base for the candy cane accent nail. For sharp precision in crafting such designs, opting for fine brushes or nail stencils is ideal. The use of either will deliver a neat and professional look.
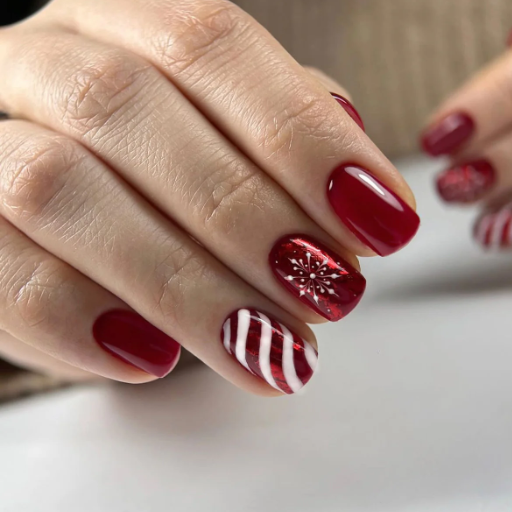
Combining Candy Canes with Snowflake Designs
Candy cane and snowflake motifs are a good mix to create a visually pleasing nail art design for the holiday. To take this approach, a diagonal candy cane stripe on one or two nails can be combined with a snowflake design on the others. In this way, each design can be appreciated independently but can be part of the holiday theme. Ensure that the background for the snowflakes is in a soft white or light blue color to provide a cold winter feel that goes well with the red and white. Also, adding small details such as glitter or rhinestones can add elegance and a dimensional feel to the design.
To get as precise as possible, use dotting pens, fine nail art brushes, or stencil guides when painting intricate details of the snowflakes. You should also use a good quality fast-drying top coat to ensure the ornament lasts throughout the holiday season. Not only is this combination fashionable, it is also practically useable as it can be color, size and placement modified at the user’s desire, all while being able to invoke the Christmas spirit.
Creating a Winter Wonderland with Candy Cane Elements
The winter season is the perfect time to bring out candy cane nail art designs. It is enough to grab people’s attention while receiving praise for cuteness. To create this design, apply a solid white base coat after prepping yourself with clean fingernails. Once this step is finished, allow it to fully dry before painting red stripes across your nails. Fine nail art brushes or striping tape are mainly used to form these lines. You can also add finishing touches by using glitter or metallic paint to delineate the band of colors.
Correct proportions and symmetry are required while preparing the candy cane nail art; otherwise, debugging would be an issue. So, while prepairing this design use a brush with 1-2 mm tip to keep things under control. Although there are various kinds of nail polish, it is vital to use one that dries fast but is not thick because that can lead to smudge marks. In the end, for the nails to last through the winter season, the art must be topped with gloss to give an eye-pleasing shine. Furthermore, ideas like changing the colors and making a design with candy canes while using a matte polish to emphasize it can also turn out splendid.
Candy Cane-Inspired Santa Nail Art
Nail Art Santa Claus Features Red, White, and Stripes, Which Are Quite Recall Ones of Santa Claus’s Hat and His Belt. First and foremost, the nails are handled with a smooth base coat to avoid staining them and to get a smooth surface altogether. Though this is Candy Nail Art, white is the base color that can highlight the stripe. The nail will have a stripe pattern to give it a candy nail art effect, which is done by striping the brush with diagonal red stripes. The details for the Santa nail art are made by applying bold red polish for the background of the nail art, and then the belt details can be painted on the nail with just a little buckle in the center, made possible by gold or yellow paint.
For your modern touch nail accents, you can apply white faux fur detailing or glitter polish on some of your nails. While applying polish, ensure you do it in thin coats with one concentration on the entire finger. To finish, one should coat the nail art with a high-gloss top to avoid damage and make it look smooth. This festive look is designed pattern-wise in an appealing way to the eye, but it also allows modification options for quite some occasions.
How to Make Your Candy Cane Nails Last Through the Holiday Season?

If you want your holiday candy cane nails to remain as fresh and glossy as they were created, you must start with a base. Always start by cleaning and buffing your nails so they don’t contain any grease or rough inconsistencies, and apply a good base coat to allow the polish to adhere better to your nails and save your natural nails from staining. Apply the polish using a simple and slow technique of applying thin amounts at a time, and make sure that after applying every coat, let it dry completely before adding a new coat so the risk of chipping and incomplete polishing can be avoided.
Once you’re done performing nail art, seal it with a firm and glossy top coat and reapply it every couple of days to reinforce the layered protection. Limit your nails and hands’ exposure to harsh soaps by using gloves while cleaning around the house. Ensure your cuticles always remain in good health by regularly hydrating your nip with cuticle oil. Carrying out all the above-mentioned procedures would help maintain the validity of the candy canes you wear throughout the festive season for weeks.
Choosing Long-Lasting Nail Polish
The best way to select a long-lasting nail polish is to consider some factors that may impact durability. First, consider investing in premium professional brands designed for extended wear. These polishes are known to include acrylic polymers, among other materials, which increase adhesion and make the polish chip-less. Moreover, go for nail polishes in gel or hybrid form that dries under UV or LED, which will last longer than the average paint.
The most optimal application technique is also essential because the best polish will still not adhere without a decent base. There must be enough emphasis on the base coat so that bonding is better and the nail surface is sufficiently leveled; this is followed by a top coat to enhance protection and gloss. How the nail is prepared, that is, cleaning, buffing, and thorough drying of the surface, also adds to the lifespan of the polish. Combined with these methods and a superior product, any manicure can last flawlessly for up to two weeks or more.
Proper Application Techniques for Longevity
A necessary requisite for achieving lasting results is lacquer’s steady and meticulous application. Start by applying a thin layer of base coat to avoid the nails from becoming stained and increase adhesion. Ensure that the base coat is completely dry before applying the polish. For the application of nail polish, for sufficient coverage, apply the polish using three strokes for each nail: one in the center and two on the sides. It is better to apply two or three thin layers to build up the color rather than a thick layer to reduce the chance of smudging and peeling of the polish. Each layer must dry thoroughly to enhance durability before adding the next coat.
Use a high-quality top coat at the end to ensure that the polish does not chip off. Reapplying the top coat every two to three days can increase the manicure’s lifespan. Do not wet the nails too much, as this can cause early damage, or use them for scraping or prying. By incorporating these professional application techniques, you will attain a suitable result that is both appealing and can last for a considerable duration.
What are Some Quick and Easy Candy Cane Nail Tutorials for Beginners?

As a beginner, you may think learning how to create candy cane nails is challenging. However, you would be pleasantly surprised to know how simple the process is. America is known to taste cherry and white, so paint your white coat around your nails so it looks like the cherry stripes of a candy cane. After the coat is dry, it is time to grab your thin striping tape or a small nail art brush and make diagonal red lines across the nails. Make sure they are parallel and evenly spaced out from one another for an even better look when creating these lines. Finally, use a good quality top coat which will finish off the design while enhancing the shine of it.
Another simple way is to use ready stickers or decals with the candy cane design cut out on them. This works best if you are starting out, as there is no need for free-hand skills. A top coat is used to secure the design after applying the stickers to the dry coat and smoothing out the bubbles formed. Whichever method you choose, both are easy and have the desired festive outcome.
Simple Stripe Patterns for Novices
Creating simple stripe patterns is arguably the easiest option for any novice wishing to achieve a decent-looking design without advanced skills. It requires applying a base coat of any of your preferred colors and letting it dry completely. After that, some peeling-off tape, which is thin strips designed for nail art, was used to deliver the stripes to the regions that would have offered the stripes. Cover these areas with a contrasting paint color, and while the polish is still wet, peel off the tape for the eye-catching stripes. A durable top coat can then be applied to protect the design and is left to dry.
Alternatively, one can choose to freehand draw the stripes using a fine tip or detail brush. This technique enables one to create a remarkable look, although it can be tricky for a beginner. It allows one to customize the stripes precisely the way one wants; however, placing them onto the nail can be a hassle. Beginners should practice their technique on pendant-oriented wheels rather than directly on nails. Both striping tape and freehand methods are pretty simple and result in a very classy and attractive look without using too many tools.
Using Nail Stickers for Effortless Candy Cane Designs
Nail stickers provide a user-friendly, efficient way to achieve intricate candy cane designs with minimal skill or effort. These pre-designed, adhesive décor elements are perfect for individuals seeking precision without the need for advanced techniques. To apply, begin by ensuring the nails are clean and dry, with a base coat applied to create a smooth foundation. Select the appropriate-sized sticker for each nail, peel it off carefully with tweezers, and position it on the nail surface. Once securely placed, gently press down from the center outward to eliminate air bubbles and ensure adhesion. Finally, seal the design with a clear top coat for durability and a polished finish.
Technical considerations include choosing high-quality nail stickers with strong adhesive backing to prevent peeling, especially when exposed to moisture or daily tasks. The stickers should be thin and flexible and contour effortlessly to the natural curve of the nail. For optimal results, pair the stickers with a long-lasting, quick-drying top coat that provides additional protection without smudging the design.
How to Incorporate Candy Cane Nails into Your Holiday Manicure Collection?
To help mix candy cane nails with your nail art during holidays, the first thing to note is that you can use red and white as the primary color palette. Get a lovely red and white nail polish so the look is striking and brings you candy cane vibes. It is also advisable to incorporate metallic touches like silver or gold for a contemporary touch and consideration. Further, opt for nail striping tape or pre-designed nail stickers for neat and proportionate lines.
Once you have established the nail art elements you want to go with, the following steps would include correctly preparing the nails by buffing and filing them, cleansing them from oils or residues, and applying a base coat. After crafting the candy cane design, keep it safe using a topcoat with a high-gloss finish that gives the manicure strength and shine. Following these procedures guarantees that your candy cane motifs nail art will be beautifully integrated into your other festive manicures and serve as an accent throughout the festive periods.
Mixing Candy Cane Designs with Other Festive Patterns
An alternative approach would have been to use candy cane nail art and other holiday designs, such as snowflakes, shimmering decorations, or Christmas ornaments. For instance, alternating snowflakes with candy stripes will yield the desired balance and composition for garnering the wow value in the design. Moreover, metallic or glittered decorations and ornaments’ proportions should add glamour and style to match the holiday mood.
When choosing colors when mixing different patterns, one may select traditional holiday colors like red, white, and silver or bold choices like green and gold. Using complementary shades ensures that the overall look is harmonious rather than overwhelming. It would be best to play with only one or two nails for designs with more intricate patterns while leaving the others plain. This way, you will avoid a crowded look on the nails. Using stamping tools, nail decals, or freehand painting techniques provides an ample opportunity to create various patterns more festively.
Creating a Cohesive Holiday Nail Art Set
An outstanding party look comprises different nail art techniques with a perfect holiday twist. Begin by choosing 2-3 colors that go well together. For instance, red, green shimmer, and gold complement a Christmas theme this season well, while a winter theme can incorporate blue and silver with white. This would make the whole set always stay true to the holiday season. Pick out features like snowflakes, candy cane stripes, or even ornaments to bulk up the details without overcomplicating the design. An example can be if your first nail art is overcrowded with many elements, then keeping the rest simple allows for balance, ensuring overall neatness.
References
Frequently Asked Questions (FAQ)
Q: What are some popular candy cane nail ideas for the holiday season?
A: Popular candy cane nail ideas include classic red and white stripes, French manicures, glittery candy cane-inspired designs, and green accents for a festive touch. These designs often feature striped patterns, sparkly elements, and sometimes rhinestones to capture the iconic look of Christmas candy canes.
Q: How can I create a candy cane French manicure?
A: To create a candy cane French manicure, start with a nude or white base. Then, use a thin brush to paint red diagonal stripes on the tips of your nails. For added flair, you can incorporate glittery elements or add a touch of green to complement the traditional red and white colors. This look combines the elegance of a French manicure with the playful spirit of candy canes.
Q: Are there any variations of candy cane nail designs that incorporate other colors?
A: While traditional candy cane designs feature red and white, many nail artists explore variations by incorporating other colors. Popular alternatives include green and white for a fresh take or even blue and white for a wintry feel. Some designs also feature gold or silver accents to add a luxurious touch to the holiday look.
Q: How can I make my candy cane nail design more sparkly and festive?
A: To make your candy cane nail design more sparkly and festive, add glittery top coats, use metallic polishes for stripes, or incorporate rhinestones. You might also consider using a sparkly base coat before applying your candy cane design. These elements will help your nails capture the light and add to the festive holiday spirit.
Q: Can you describe some Instagram-worthy candy cane nail ideas?
A: Instagram-worthy candy cane nail ideas often feature intricate designs and unique twists on the classic look. Some popular options include ombre candy cane stripes, negative space designs incorporating candy cane elements, or 3D decorations on an accent nail. Adding seasonal elements like snowflakes or holly alongside the candy cane design can also create a stunning and shareable result.
Q: How do I prepare my nails for a candy cane design?
A: To prepare your nails for a candy cane design, start by shaping them and pushing back your cuticles. Apply a base coat to protect your nails and help the polish adhere better. If you’re planning a design with a white background, you might want to apply white polish first and let it dry completely. This preparation will ensure your candy cane design looks crisp and lasts throughout the holiday season.
Q: Are there any video tutorials you’d recommend for candy cane nail designs?
A: While I can’t provide specific video links, many excellent tutorials are available on platforms like YouTube and Instagram. Search for “candy cane nail art tutorial” or “Christmas nail designs” to find step-by-step videos. These tutorials often showcase a variety of techniques and can inspire you to create your own unique candy cane nail look. Don’t forget to save your favorites for easy reference when you’re ready to try the designs!


